šČČń║öšźá Servlet
ńŞÇ Servletš«Çń╗ő
1.1 ňŐĘŠÇüŔÁäŠ║ÉňĺîÚŁÖŠÇüŔÁäŠ║É
ÚŁÖŠÇüŔÁäŠ║É
- ŠŚáÚťÇňťĘšĘőň║ĆŔ┐ÉŔíÂÚÇÜŔ┐çń╗úšáüŔ┐ÉŔíîšö芳ɚÜäŔÁäŠ║É,ňťĘšĘőň║ĆŔ┐ÉŔíîń╣őňëŹň░▒ňćÖňąŻšÜäŔÁäŠ║É. ńżőňŽé:html css js img ,Úč│ÚóĹŠľçń╗ÂňĺîŔžćÚóĹŠľçń╗Â
ňŐĘŠÇüŔÁäŠ║É
- ÚťÇŔŽüňťĘšĘőň║ĆŔ┐ÉŔíÂÚÇÜŔ┐çń╗úšáüŔ┐ÉŔíîšö芳ɚÜäŔÁäŠ║É,ňťĘšĘőň║ĆŔ┐ÉŔíîń╣őň돊ŚáŠ│Ľší«ň«ÜšÜ䊼░ŠŹ«,Ŕ┐ÉŔíÂňŐĘŠÇüšö芳É,ńżőňŽéServlet,Thymeleaf ... ...
- ňŐĘŠÇüŔÁäŠ║ÉŠîçšÜäńŞŹŠś»ŔžćňŤżńŞŐšÜäňŐĘšö╗ŠĽłŠ×ťŠłľŔÇůŠś»š«ÇňŹĽšÜäń║║Šť║ń║Ąń║劼łŠ×ť
šöčŠ┤╗ńŞżńżő
- ňÄ╗ŔŤőš│Ľň║Śń╣░ŔŤőš│Ľ
- šŤ┤ŠÄąń╣░ŠčťňĆ░ńŞŐňĚ▓š╗ĆňüÜňąŻšÜä : ÚŁÖŠÇüŔÁäŠ║É
- ňĺîŠčťňĹśŔ»┤ŔŽüŠ▒éňÉÄšÄ░ňť║ňłÂńŻť : ňŐĘŠÇüŔÁäŠ║É
1.2 Servletš«Çń╗ő
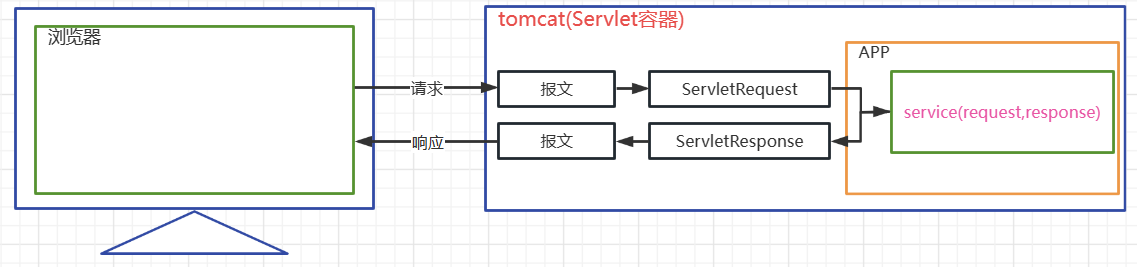
Servlet (server applet) Šś»Ŕ┐ÉŔíîňťĘŠťŹňŐíšź»(tomcat)šÜäJavaň░ĆšĘőň║Ć´╝»sunňůČňĆŞŠĆÉńżŤńŞÇňąŚň«Üń╣ëňŐĘŠÇüŔÁäŠ║ÉŔžäŔîâ; ń╗Äń╗úšáüň▒éÚŁóńŞŐŠŁąŔ«▓Servletň░▒Šś»ńŞÇńެŠÄąňĆú
- šöĘŠŁąŠÄąŠöÂŃÇüňĄäšÉćň«óŠłĚšź»Ŕ»ĚŠ▒éŃÇüňôŹň║öš╗ÖŠÁĆŔžłňÖĘšÜäňŐĘŠÇüŔÁäŠ║ÉŃÇéňťĘŠĽ┤ńެWebň║öšöĘńŞş´╝îServletńŞ╗ŔŽüŔ┤čŔ┤úŠÄąŠöÂňĄäšÉćŔ»ĚŠ▒éŃÇüňŹĆňÉîŔ░âň║ŽňŐčŔâŻń╗ąňĆŐňôŹň║öŠĽ░ŠŹ«ŃÇ銳Ĺń╗ČňĆ»ń╗ąŠŐŐServletšž░ńŞ║Webň║öšöĘńŞşšÜäŠÄžňłÂňÖĘ

- ńŞŹŠś»ŠëÇŠťëšÜäJAVAš▒╗ÚâŻŔ⯚öĘń║ÄňĄäšÉćň«óŠłĚšź»Ŕ»ĚŠ▒é,ŔâŻňĄäšÉćň«óŠłĚšź»Ŕ»ĚŠ▒éň╣ÂňüÜňç║ňôŹň║öšÜäńŞÇňąŚŠŐÇŠť»Šáçňçćň░▒Šś»Servlet
- ServletŠś»Ŕ┐ÉŔíîňťĘŠťŹňŐíšź»šÜä,ŠëÇń╗ą Servletň┐ůÚí╗ňťĘWEBÚí╣šŤ«ńŞşň╝ÇňĆĹńŞöňťĘTomcatŔ┐ÖŠáĚšÜ䊝ŹňŐíň«╣ňÖĘńŞşŔ┐ÉŔíî
Ŕ»ĚŠ▒éňôŹň║öńŞÄHttpServletRequestňĺîHttpServletResponseń╣őÚŚ┤šÜäň»╣ň║öňů│š│╗
ń║î Servletň╝ÇňĆĹŠÁüšĘő
2.1 šŤ«Šáç
ŠáíÚ¬îŠ│ĘňćÂ,šöĘŠłĚňÉŹŠś»ňÉŽŔóźňŹášöĘ. ÚÇÜŔ┐çň«óŠłĚšź»ňÉĹńŞÇńެServletňĆĹÚÇüŔ»ĚŠ▒é,ŠÉ║ňŞŽusername,ňŽéŠ×ťšöĘŠłĚňÉŹŠś»'atguigu',ňłÖňÉĹň«óŠłĚšź»ňôŹň║ö NO,ňŽéŠ×ťŠś»ňůÂń╗ľ,ňôŹň║öYES
2.2 ň╝ÇňĆĹŔ┐çšĘő
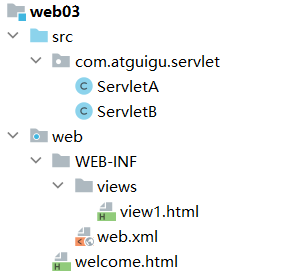
ŠşąÚ¬Ą1 ň╝ÇňĆĹńŞÇńެwebš▒╗ň×őšÜämodule
- Ŕ┐çšĘőňĆéšůžń╣őňëŹ
ŠşąÚ¬Ą2 ň╝ÇňĆĹńŞÇńެUserServlet
public class UserServlet extends HttpServlet {
@Override
protected void service(HttpServletRequest req, HttpServletResponse resp) throws ServletException, IOException {
// ŔÄĚňĆľŔ»ĚŠ▒éńŞşšÜäňĆ銼░
String username = req.getParameter("username");
if("atguigu".equals(username)){
//ÚÇÜŔ┐çňôŹň║öň»╣Ŕ▒íňôŹň║öń┐íŠü»
resp.getWriter().write("NO");
}else{
resp.getWriter().write("YES");
}
}
}
- Ŕç¬ň«Üń╣ëńŞÇńެš▒╗,ŔŽüš╗žŠë┐HttpServletš▒╗
- ÚçŹňćÖserviceŠľ╣Š│Ľ,Ŕ»ąŠľ╣Š│ĽńŞ╗ŔŽüň░▒Šś»šöĘń║ÄňĄäšÉćšöĘŠłĚŔ»ĚŠ▒éšÜ䊝ŹňŐ튾╣Š│Ľ
- HttpServletRequest ń╗úŔíĘŔ»ĚŠ▒éň»╣Ŕ▒í,Šś»ŠťëŔ»ĚŠ▒éŠŐąŠľçš╗ĆŔ┐çtomcatŔŻČŠŹóŔÇąšÜä,ÚÇÜŔ┐çŔ»ąň»╣Ŕ▒íňĆ»ń╗ąŔÄĚňĆľŔ»ĚŠ▒éńŞşšÜäń┐íŠü»
- HttpServletResponse ń╗úŔíĘňôŹň║öň»╣Ŕ▒í,Ŕ»ąň»╣Ŕ▒íń╝ÜŔóźtomcatŔŻČŠŹóńŞ║ňôŹň║öšÜäŠŐąŠľç,ÚÇÜŔ┐çŔ»ąň»╣Ŕ▒íňĆ»ń╗ąŔ«żšŻ«ňôŹň║öńŞşšÜäń┐íŠü»
- Servletň»╣Ŕ▒íšÜäšöčňĹŻňĹĘŠťč(ňłŤň╗║,ňłŁňžőňîľ,ňĄäšÉ抝ŹňŐí,ÚöÇŠ»ü)Šś»šö▒tomcatš«íšÉćšÜä,ŠŚáڝNJłĹń╗ČŔç¬ňĚ▒new
- HttpServletRequest HttpServletResponse ńŞĄńެň»╣Ŕ▒íń╣芜»ŠťëtomcatŔ┤čŔ┤úŔŻČŠŹó,ňťĘŔ░âšöĘserviceŠľ╣Š│ĽŠŚÂń╝áňůąš╗ÖŠłĹń╗ČšöĘšÜä
ŠşąÚ¬Ą3 ňťĘweb.xmlńŞ║UseServletÚůŹšŻ«Ŕ»ĚŠ▒éšÜ䊜áň░äŔĚ»ňżä
<?xml version="1.0" encoding="UTF-8"?>
<web-app xmlns="https://jakarta.ee/xml/ns/jakartaee"
xmlns:xsi="http://www.w3.org/2001/XMLSchema-instance"
xsi:schemaLocation="https://jakarta.ee/xml/ns/jakartaee https://jakarta.ee/xml/ns/jakartaee/web-app_5_0.xsd"
version="5.0">
<servlet>
<!--š╗ÖUserServletŔÁĚńŞÇńެňłźňÉŹ-->
<servlet-name>userServlet</servlet-name>
<servlet-class>com.atguigu.servlet.UserServlet</servlet-class>
</servlet>
<servlet-mapping>
<!--ňů│ŔüöňłźňÉŹňĺáň░äŔĚ»ňżä-->
<servlet-name>userServlet</servlet-name>
<!--ňĆ»ń╗ąńŞ║ńŞÇńެServletňî╣ÚůŹňĄÜńެńŞŹňÉîšÜ䊜áň░äŔĚ»ňżä,ńŻćŠś»ńŞŹňÉîšÜäServletńŞŹŔâŻńŻ┐šöĘšŤŞňÉîšÜäurl-pattern-->
<url-pattern>/userServlet</url-pattern>
<!-- <url-pattern>/userServlet2</url-pattern>-->
<!--
/ ŔíĘšĄ║ÚÇÜÚůŹŠëÇŠťëŔÁäŠ║É,ńŞŹňîůŠőČjspŠľçń╗Â
/* ŔíĘšĄ║ÚÇÜÚůŹŠëÇŠťëŔÁäŠ║É,ňîůŠőČjspŠľçń╗Â
/a/* ňî╣ÚůŹŠëÇŠťëń╗ąaň돚╝ÇšÜ䊜áň░äŔĚ»ňżä
*.action ňî╣ÚůŹŠëÇŠťëń╗ąactionńŞ║ňÉÄš╝ÇšÜ䊜áň░äŔĚ»ňżä
-->
<!-- <url-pattern>/*</url-pattern>-->
</servlet-mapping>
</web-app>
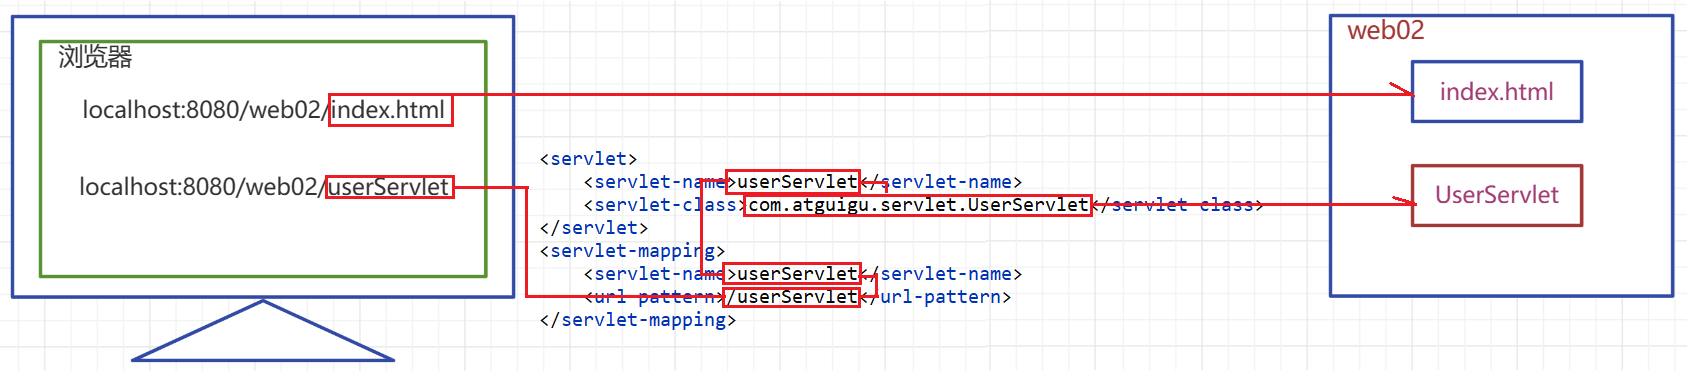
- Servletň╣ÂńŞŹŠś»Šľçń╗š│╗š╗čńŞşň«×ÚÖůňşśňťĘšÜ䊾çń╗ŠłľŔÇůšŤ«ňŻĽ,ŠëÇń╗ąńŞ║ń║ćŔâŻňĄčŔ»ĚŠ▒éňł░Ŕ»ąŔÁäŠ║É,ŠłĹń╗ČÚťÇŔŽüńŞ║ňůÂÚůŹšŻ«Šśáň░äŔĚ»ňżä
- servletšÜäŔ»ĚŠ▒銜áň░äŔĚ»ňżäÚůŹšŻ«ňťĘweb.xmlńŞş
- servlet-nameńŻťńŞ║servletšÜäňłźňÉŹ,ňĆ»ń╗ąŔç¬ňĚ▒ÚÜĆŠäĆň«Üń╣ë,ŔžüňÉŹščąŠäĆň░▒ňąŻ
- url-patternŠáçšşżšöĘń║Äň«Üń╣ëServletšÜäŔ»ĚŠ▒銜áň░äŔĚ»ňżä
- ńŞÇńެservletňĆ»ń╗ąň»╣ň║öňĄÜńެńŞŹňÉîšÜäurl-pattern
- ňĄÜńެservletńŞŹŔâŻńŻ┐šöĘšŤŞňÉîšÜäurl-pattern
- url-patternńŞşňĆ»ń╗ąńŻ┐šöĘńŞÇń║ŤÚÇÜÚůŹňćÖŠ│Ľ
- / ŔíĘšĄ║ÚÇÜÚůŹŠëÇŠťëŔÁäŠ║É,ńŞŹňîůŠőČjspŠľçń╗Â
- /* ŔíĘšĄ║ÚÇÜÚůŹŠëÇŠťëŔÁäŠ║É,ňîůŠőČjspŠľçń╗Â
- /a/* ňî╣ÚůŹŠëÇŠťëń╗ąaň돚╝ÇšÜ䊜áň░äŔĚ»ňżä
- *.action ňî╣ÚůŹŠëÇŠťëń╗ąactionńŞ║ňÉÄš╝ÇšÜ䊜áň░äŔĚ»ňżä
ŠşąÚ¬Ą4 ň╝ÇňĆĹńŞÇńެformŔíĘňŹĽ,ňÉĹservletňĆĹÚÇüńŞÇńެgetŔ»ĚŠ▒éň╣ŠÉ║ňŞŽusernameňĆ銼░
<!DOCTYPE html>
<html lang="en">
<head>
<meta charset="UTF-8">
<title>Title</title>
</head>
<body>
<form action="userServlet">
Ŕ»ĚŔżôňůąšöĘŠłĚňÉŹ:<input type="text" name="username" /> <br>
<input type="submit" value="ŠáíÚ¬î">
</form>
</body>
</html>
ňÉ»ňŐĘÚí╣šŤ«,Ŕ«┐ÚŚ«index.html ,ŠĆÉń║ĄŔíĘňŹĽŠÁőŔ»Ľ
- ńŻ┐šöĘdebugŠĘíň╝ĆŔ┐ÉŔíîŠÁőŔ»Ľ

Šśáň░äňů│š│╗ňŤż
ńŞë ServletŠ│ĘŔžúŠľ╣ň╝ĆÚůŹšŻ«
3.1 @WebServletŠ│ĘŔžúŠ║Éšáü
ň«śŠľ╣JAVAEEAPIŠľçŠíúńŞőŔŻŻňť░ňŁÇ
-
@WebServletŠ│ĘŔžúšÜäŠ║ÉšáüÚśůŔ»╗
package jakarta.servlet.annotation;
import java.lang.annotation.Documented;
import java.lang.annotation.ElementType;
import java.lang.annotation.Retention;
import java.lang.annotation.RetentionPolicy;
import java.lang.annotation.Target;
/**
* @since Servlet 3.0
*/
@Target({ ElementType.TYPE })
@Retention(RetentionPolicy.RUNTIME)
@Documented
public @interface WebServlet {
/**
* The name of the servlet
* šŤŞňŻôń║Ä servlet-name
* @return the name of the servlet
*/
String name() default "";
/**
* The URL patterns of the servlet
* ňŽéŠ×ťňƬÚůŹšŻ«ńŞÇńެurl-pattern ,ňłÖÚÇÜŔ┐çŔ»ąň▒׊ǞňŹ│ňĆ»,ňĺîurlPatternsň▒׊Ǟń║劾ą
* @return the URL patterns of the servlet
*/
String[] value() default {};
/**
* The URL patterns of the servlet
* ňŽéŠ×ťŔŽüÚůŹšŻ«ňĄÜńެurl-pattern ,ÚťÇŔŽüÚÇÜŔ┐çŔ»ąň▒׊Ǟ,ňĺîvalueň▒׊Ǟń║劾ą
* @return the URL patterns of the servlet
*/
String[] urlPatterns() default {};
/**
* The load-on-startup order of the servlet
* ÚůŹšŻ«ServletŠś»ňÉŽňťĘÚí╣šŤ«ňŐáŔŻŻŠŚÂň«×ńżőňîľ
* @return the load-on-startup order of the servlet
*/
int loadOnStartup() default -1;
/**
* The init parameters of the servlet
* ÚůŹšŻ«ňłŁňžőňîľňĆ銼░
* @return the init parameters of the servlet
*/
WebInitParam[] initParams() default {};
/**
* Declares whether the servlet supports asynchronous operation mode.
*
* @return {@code true} if the servlet supports asynchronous operation mode
* @see jakarta.servlet.ServletRequest#startAsync
* @see jakarta.servlet.ServletRequest#startAsync( jakarta.servlet.ServletRequest,jakarta.servlet.ServletResponse)
*/
boolean asyncSupported() default false;
/**
* The small-icon of the servlet
*
* @return the small-icon of the servlet
*/
String smallIcon() default "";
/**
* The large-icon of the servlet
*
* @return the large-icon of the servlet
*/
String largeIcon() default "";
/**
* The description of the servlet
*
* @return the description of the servlet
*/
String description() default "";
/**
* The display name of the servlet
*
* @return the display name of the servlet
*/
String displayName() default "";
}
3.2 @WebServletŠ│ĘŔžúńŻ┐šöĘ
ńŻ┐šöĘ@WebServletŠ│ĘŔžúŠŤ┐ŠŹóServletÚůŹšŻ«
@WebServlet(
name = "userServlet",
//value = "/user",
urlPatterns = {"/userServlet1","/userServlet2","/userServlet"},
initParams = {@WebInitParam(name = "encoding",value = "UTF-8")},
loadOnStartup = 6
)
public class UserServlet extends HttpServlet {
@Override
protected void service(HttpServletRequest req, HttpServletResponse resp) throws ServletException, IOException {
String encoding = getServletConfig().getInitParameter("encoding");
System.out.println(encoding);
// ŔÄĚňĆľŔ»ĚŠ▒éńŞşšÜäňĆ銼░
String username = req.getParameter("username");
if("atguigu".equals(username)){
//ÚÇÜŔ┐çňôŹň║öň»╣Ŕ▒íňôŹň║öń┐íŠü»
resp.getWriter().write("NO");
}else{
resp.getWriter().write("YES");
}
}
}
ňŤŤ ServletšöčňĹŻňĹĘŠťč
4.1 šöčňĹŻňĹĘŠťčš«Çń╗ő
ń╗Çń╣łŠś»ServletšÜäšöčňĹŻňĹĘŠťč
- ň║öšöĘšĘőň║ĆńŞşšÜäň»╣Ŕ▒íńŞŹń╗ůňťĘšę║ÚŚ┤ńŞŐŠťëň▒éŠČíš╗ôŠ×äšÜäňů│š│╗´╝îňťĘŠŚÂÚŚ┤ńŞŐń╣čń╝ÜňŤáńŞ║ňĄäń║ÄšĘőň║ĆŔ┐ÉŔíîŔ┐çšĘőńŞşšÜäńŞŹňÉîڜŠ«ÁŔÇîŔíĘšÄ░ňç║ńŞŹňÉîšŐŠÇüňĺîńŞŹňÉîŔíîńŞ║ÔÇöÔÇöŔ┐Öň░▒Šś»ň»╣Ŕ▒íšÜäšöčňĹŻňĹĘŠťčŃÇé
- š«ÇňŹĽšÜäňĆÖŔ┐░šöčňĹŻňĹĘŠťč´╝îň░▒Šś»ň»╣Ŕ▒íňťĘň«╣ňÖĘńŞşń╗Äň╝ÇňžőňłŤň╗║ňł░ÚöÇŠ»üšÜäŔ┐çšĘőŃÇé
Servletň«╣ňÖĘ
- Servletň»╣Ŕ▒튜»Servletň«╣ňÖĘňłŤň╗║šÜä´╝îšöčňĹŻňĹĘŠťčŠľ╣Š│ĽÚ⯊ś»šö▒ň«╣ňÖĘ(šŤ«ň돊łĹń╗ČńŻ┐šöĘšÜ䊜»Tomcat)Ŕ░âšöĘšÜäŃÇéŔ┐ÖńŞÇšé╣ňĺĹń╗Čń╣őň돊ëÇš╝ľňćÖšÜäń╗úšáüŠťëňżłňĄžńŞŹňÉîŃÇéňťĘń╗ŐňÉÄšÜäňşŽń╣áńŞşŠłĹń╗Čń╝Üšťőňł░´╝îŔÂŐŠŁąŔÂŐňĄÜšÜäň»╣Ŕ▒íń║Ąš╗Öň«╣ňÖĘŠłľŠíćŠ×ŠŁąňłŤň╗║´╝îŔÂŐŠŁąŔÂŐňĄÜšÜ䊾╣Š│Ľšö▒ň«╣ňÖĘŠłľŠíćŠ×ŠŁąŔ░âšöĘ´╝îň╝ÇňĆĹń║║ňĹśŔŽüň░ŻňĆ»ŔâŻňĄÜšÜäň░ćš▓żňŐŤŠöżňťĘńŞÜňŐíÚÇ╗ŔżĹšÜäň«×šÄ░ńŞŐŃÇé
ServletńŞ╗ŔŽüšÜäšöčňĹŻňĹĘŠťčŠëžŔíîšë╣šé╣
| šöčňĹŻňĹĘŠťč | ň»╣ň║öŠľ╣Š│Ľ | ŠëžŔíŠť║ | ŠëžŔíîŠČ튼░ |
|---|---|---|---|
| Š×äÚÇáň»╣Ŕ▒í | Š×äÚÇáňÖĘ | šČČńŞÇŠČíŔ»ĚŠ▒銳ľŔÇůň«╣ňÖĘňÉ»ňŐĘ | 1 |
| ňłŁňžőňîľ | init() | Š×äÚÇáň«îŠ»ĽňÉÄ | 1 |
| ňĄäšÉ抝ŹňŐí | service(HttpServletRequest req,HttpServletResponse resp) | Š»ĆŠČíŔ»ĚŠ▒é | ňĄÜŠČí |
| ÚöÇŠ»ü | destory() | ň«╣ňÖĘňů│ÚŚş | 1 |
4.2 šöčňĹŻňĹĘŠťčŠÁőŔ»Ľ
ň╝ÇňĆĹservletń╗úšáü
package com.atguigu.servlet;
import jakarta.servlet.ServletException;
import jakarta.servlet.http.HttpServlet;
import jakarta.servlet.http.HttpServletRequest;
import jakarta.servlet.http.HttpServletResponse;
import java.io.IOException;
public class ServletLifeCycle extends HttpServlet {
public ServletLifeCycle(){
System.out.println("Š×äÚÇáňÖĘ");
}
@Override
public void init() throws ServletException {
System.out.println("ňłŁňžőňľ╣Š│Ľ");
}
@Override
protected void service(HttpServletRequest req, HttpServletResponse resp) throws ServletException, IOException {
System.out.println("serviceŠľ╣Š│Ľ");
}
@Override
public void destroy() {
System.out.println("ÚöÇŠ»üŠľ╣Š│Ľ");
}
}
ÚůŹšŻ«Servlet
<servlet>
<servlet-name>servletLifeCycle</servlet-name>
<servlet-class>com.atguigu.servlet.ServletLifeCycle</servlet-class>
<!--load-on-startup
ňŽéŠ×ťÚůŹšŻ«šÜ䊜»ŠşúŠĽ┤ŠĽ░ňłÖŔíĘšĄ║ň«╣ňÖĘňťĘňÉ»ňŐĘŠŚÂň░▒ŔŽüň«×ńżőňîľServlet,
ŠĽ░ňşŚŔíĘšĄ║šÜ䊜»ň«×ńżőňîľšÜäÚí║ň║Ć
-->
<load-on-startup>1</load-on-startup>
</servlet>
<servlet-mapping>
<servlet-name>servletLifeCycle</servlet-name>
<url-pattern>/servletLiftCycle</url-pattern>
</servlet-mapping>
- Ŕ»ĚŠ▒éServletŠÁőŔ»Ľ
šĽą
4.3 šöčňĹŻňĹĘŠťčŠÇ╗š╗ô
- ÚÇÜŔ┐çšöčňĹŻňĹĘŠťčŠÁőŔ»ĽŠłĹń╗ČňĆĹšÄ░Servletň»╣Ŕ▒íňťĘň«╣ňÖĘńŞşŠś»ňŹĽńżőšÜä
- ň«╣ňÖĘŠś»ňĆ»ń╗ąňĄäšÉćň╣ÂňĆĹšÜäšöĘŠłĚŔ»ĚŠ▒éšÜä,Š»ĆńެŔ»ĚŠ▒éňťĘň«╣ňÖĘńŞşÚâŻń╝Üň╝ÇňÉ»ńŞÇńެš║┐šĘő
- ňĄÜńެš║┐šĘőňĆ»ŔâŻń╝ÜńŻ┐šöĘšŤŞňÉîšÜäServletň»╣Ŕ▒í,ŠëÇń╗ąňťĘServletńŞş,ŠłĹń╗ČńŞŹŔŽüŔŻ╗Šśôň«Üń╣ëńŞÇń║Ťň«╣Šśôš╗ĆňŞŞňĆĹšöčń┐«Šö╣šÜ䊳ÉňĹśňĆśÚçĆ
- load-on-startupńŞşň«Üń╣ëšÜ䊺úŠĽ┤ŠĽ░ŔíĘšĄ║ň«×ńżőňîľÚí║ň║Ć,ňŽéŠ×ťŠĽ░ňşŚÚçŹňĄŹń║ć,ň«╣ňÖĘń╝ÜŔç¬ŔíîŔžúňć│ň«×ńżőňîľÚí║ň║ĆÚŚ«Úóś,ńŻćŠś»ň║öŔ»ąÚü┐ňůŹÚçŹňĄŹ
- Tomcatň«╣ňÖĘńŞş,ňĚ▓š╗Ćň«Üń╣ëń║ćńŞÇń║ŤÚÜĆš│╗š╗čňÉ»ňŐĘň«×ńżőňîľšÜäservlet,ŠłĹń╗ČŔç¬ň«Üń╣ëšÜäservletšÜäload-on-startupň░ŻÚçĆńŞŹŔŽüňŹášöĘŠĽ░ňşŚ1-5
ń║ö Servletš╗žŠë┐š╗ôŠ×ä
5.1 Servlet ŠÄąňĆú
Š║ÉšáüňĆŐňŐčŔâŻŔžúÚçŐ
- ÚÇÜŔ┐çideaŠčąšťő: ŠşĄňĄäšĽą
ŠÄąňĆúňĆŐŠľ╣Š│ĽŔ»┤ŠśÄ
- Servlet ŔžäŔîâŠÄąňĆú,ŠëÇŠťëšÜäServletň┐ůÚí╗ň«×šÄ░
- public void init(ServletConfig config) throws ServletException;
- ňłŁňžőňľ╣Š│Ľ,ň«╣ňÖĘňťĘŠ×äÚÇáservletň»╣Ŕ▒íňÉÄ,Ŕç¬ňŐĘŔ░âšöĘšÜ䊾╣Š│Ľ,ň«╣ňÖĘŔ┤čŔ┤úň«×ńżőňîľńŞÇńެServletConfigň»╣Ŕ▒í,ň╣ÂňťĘŔ░âšöĘŔ»ąŠľ╣Š│ĽŠŚÂń╝áňůą
- ServletConfigň»╣Ŕ▒íňĆ»ń╗ąńŞ║Servlet ŠĆÉńżŤňłŁňžőňîľňĆ銼░
- public ServletConfig getServletConfig();
- ŔÄĚňĆľServletConfigň»╣Ŕ▒íšÜ䊾╣Š│Ľ,ňÉÄš╗şňĆ»ń╗ąÚÇÜŔ┐çŔ»ąň»╣Ŕ▒íŔÄĚňĆľServletňłŁňžőňîľňĆ銼░
- public void service(ServletRequest req, ServletResponse res) throws ServletException, IOException;
- ňĄäšÉćŔ»ĚŠ▒éň╣ÂňüÜňç║ňôŹň║öšÜ䊝ŹňŐ튾╣Š│Ľ,Š»ĆŠČíŔ»ĚŠ▒éń║žšö芌šö▒ň«╣ňÖĘŔ░âšöĘ
- ň«╣ňÖĘňłŤň╗║ńŞÇńެServletRequestň»╣Ŕ▒íňĺîServletResponseň»╣Ŕ▒í,ň«╣ňÖĘňťĘŔ░âšöĘserviceŠľ╣Š│ĽŠŚÂ,ń╝áňůąŔ┐ÖńŞĄńެň»╣Ŕ▒í
- public String getServletInfo();
- ŔÄĚňĆľServletInfoń┐íŠü»šÜ䊾╣Š│Ľ
- public void destroy();
- Servletň«×ńżőňťĘÚöÇŠ»üń╣őňëŹŔ░âšöĘšÜ䊾╣Š│Ľ
- public void init(ServletConfig config) throws ServletException;
5.2 GenericServlet ŠŐŻŔ▒íš▒╗
Š║Éšáü
- ÚÇÜŔ┐çideaŠčąšťő: ŠşĄňĄäšĽą
Š║ÉšáüŔžúÚçŐ
- GenericServlet ŠŐŻŔ▒íš▒╗Šś»ň»╣ServletŠÄąňĆúńŞÇń║ŤňŤ║ň«ÜňŐčŔ⯚Üäš▓Śš│Öň«×šÄ░,ń╗ąňĆŐň»╣serviceŠľ╣Š│ĽšÜäň揊ČíŠŐŻŔ▒íňú░ŠśÄ,ň╣Âň«Üń╣ëń║ćńŞÇń║ŤňůÂń╗ľšŤŞňů│ňŐčŔ⯊ľ╣Š│Ľ
- private transient ServletConfig config;
- ňłŁňžőňîľÚůŹšŻ«ň»╣Ŕ▒íńŻťńŞ║ň▒׊Ǟ
- public GenericServlet() { }
- Š×äÚÇáňÖĘ,ńŞ║ń║ćŠ╗íŔÂ│š╗žŠë┐ŔÇîňçćňĄç
- public void destroy() { }
- ÚöÇŠ»üŠľ╣Š│ĽšÜäň╣│ň║Şň«×šÄ░
- public String getInitParameter(String name)
- ŔÄĚňĆľňłŁňžőňĆ銼░šÜäň┐źŠŹĚŠľ╣Š│Ľ
- public Enumeration
getInitParameterNames() - Ŕ┐öňŤ×ŠëÇŠťëňłŁňžőňîľňĆ銼░ňÉŹšÜ䊾╣Š│Ľ
- public ServletConfig getServletConfig()
- ŔÄĚňĆľňłŁňžőServletňłŁňžőÚůŹšŻ«ň»╣Ŕ▒íServletConfigšÜ䊾╣Š│Ľ
- public ServletContext getServletContext()
- ŔÄĚňĆľńŞŐńŞőŠľçň»╣Ŕ▒íServletContextšÜ䊾╣Š│Ľ
- public String getServletInfo()
- ŔÄĚňĆľServletń┐íŠü»šÜäň╣│ň║Şň«×šÄ░
- public void init(ServletConfig config) throws ServletException()
- ňłŁňžőňľ╣Š│ĽšÜäň«×šÄ░,ň╣ÂňťĘŠşĄŔ░âšöĘń║ćinitšÜäÚçŹŔŻŻŠľ╣Š│Ľ
- public void init() throws ServletException
- ÚçŹŔŻŻinitŠľ╣Š│Ľ,ńŞ║ń║ćŔ«ęŠłĹń╗ČŔç¬ňĚ▒ň«Üń╣ëňłŁňžőňîľňŐčŔ⯚Ü䊾╣Š│Ľ
- public void log(String msg)
- public void log(String message, Throwable t)
- ŠëôňŹ░ŠŚąň┐ŚšÜ䊾╣Š│ĽňĆŐÚçŹŔŻŻ
- public abstract void service(ServletRequest req, ServletResponse res) throws ServletException, IOException;
- ŠťŹňŐ튾╣Š│Ľň揊Číňú░ŠśÄ
- public String getServletName()
- ŔÄĚňĆľServletNamešÜ䊾╣Š│Ľ
- private transient ServletConfig config;
5.3 HttpServlet ŠŐŻŔ▒íš▒╗
Š║Éšáü
- ÚÇÜŔ┐çideaŠčąšťő: ŠşĄňĄäšĽą
ŔžúÚçŐ
- abstract class HttpServlet extends GenericServlet HttpServletŠŐŻŔ▒íš▒╗,ÚÖĄń║ćňč║ŠťČšÜäň«×šÄ░ń╗ąňĄľ,ňó×ňŐáń║抍┤ňĄÜšÜäňč║šíÇňŐčŔâŻ
- private static final String METHOD_DELETE = "DELETE";
- private static final String METHOD_HEAD = "HEAD";
- private static final String METHOD_GET = "GET";
- private static final String METHOD_OPTIONS = "OPTIONS";
- private static final String METHOD_POST = "POST";
- private static final String METHOD_PUT = "PUT";
- private static final String METHOD_TRACE = "TRACE";
- ńŞŐŔ┐░ň▒׊ǞšöĘń║Äň«Üń╣ëňŞŞŔžüŔ»ĚŠ▒銾╣ň╝ĆňÉŹňŞŞÚçĆňÇ╝
- public HttpServlet() {}
- Š×äÚÇáňÖĘ,šöĘń║ÄňĄäšÉćš╗žŠë┐
- public void service(ServletRequest req, ServletResponse res) throws ServletException, IOException
- ň»╣ŠťŹňŐ튾╣Š│ĽšÜäň«×šÄ░
- ňťĘŔ»ąŠľ╣Š│ĽńŞş,ň░ćŔ»ĚŠ▒éňĺîňôŹň║öň»╣Ŕ▒íŔŻČŠŹóŠłÉň»╣ň║öHTTPňŹĆŔ««šÜäHttpServletRequest HttpServletResponseň»╣Ŕ▒í
- Ŕ░âšöĘÚçŹŔŻŻšÜäserviceŠľ╣Š│Ľ
- public void service(HttpServletRequest req, HttpServletResponse res) throws ServletException, IOException
- ÚçŹŔŻŻšÜäserviceŠľ╣Š│Ľ,ŔóźÚçŹňćÖšÜäserviceŠľ╣Š│ĽŠëÇŔ░âšöĘ
- ňťĘŔ»ąŠľ╣Š│ĽńŞş,ÚÇÜŔ┐çŔ»ĚŠ▒銾╣ň╝ĆňłĄŠľş,Ŕ░âšöĘňůĚńŻôšÜädo***Šľ╣Š│Ľň«îŠłÉŔ»ĚŠ▒éšÜäňĄäšÉć
- protected void doGet(HttpServletRequest req, HttpServletResponse resp) throws ServletException, IOException
- protected void doPost(HttpServletRequest req, HttpServletResponse resp) throws ServletException, IOException
- protected void doHead(HttpServletRequest req, HttpServletResponse resp) throws ServletException, IOException
- protected void doPut(HttpServletRequest req, HttpServletResponse resp) throws ServletException, IOException
- protected void doDelete(HttpServletRequest req, HttpServletResponse resp) throws ServletException, IOException
- protected void doOptions(HttpServletRequest req, HttpServletResponse resp) throws ServletException, IOException
- protected void doTrace(HttpServletRequest req, HttpServletResponse resp) throws ServletException, IOException
- ň»╣ň║öńŞŹňÉîŔ»ĚŠ▒銾╣ň╝ĆšÜäňĄäšÉ抾╣Š│Ľ
- ÚÖĄń║ćdoOptionsňĺîdoTraceŠľ╣Š│Ľ,ňůÂń╗ľšÜädo*** Šľ╣Š│ĽÚâŻňťĘŠĽůŠäĆňôŹň║öÚöÖŔ»»ń┐íŠü»
5.4 Ŕç¬ň«Üń╣ëServlet
š╗žŠë┐ňů│š│╗ňŤżŔžú
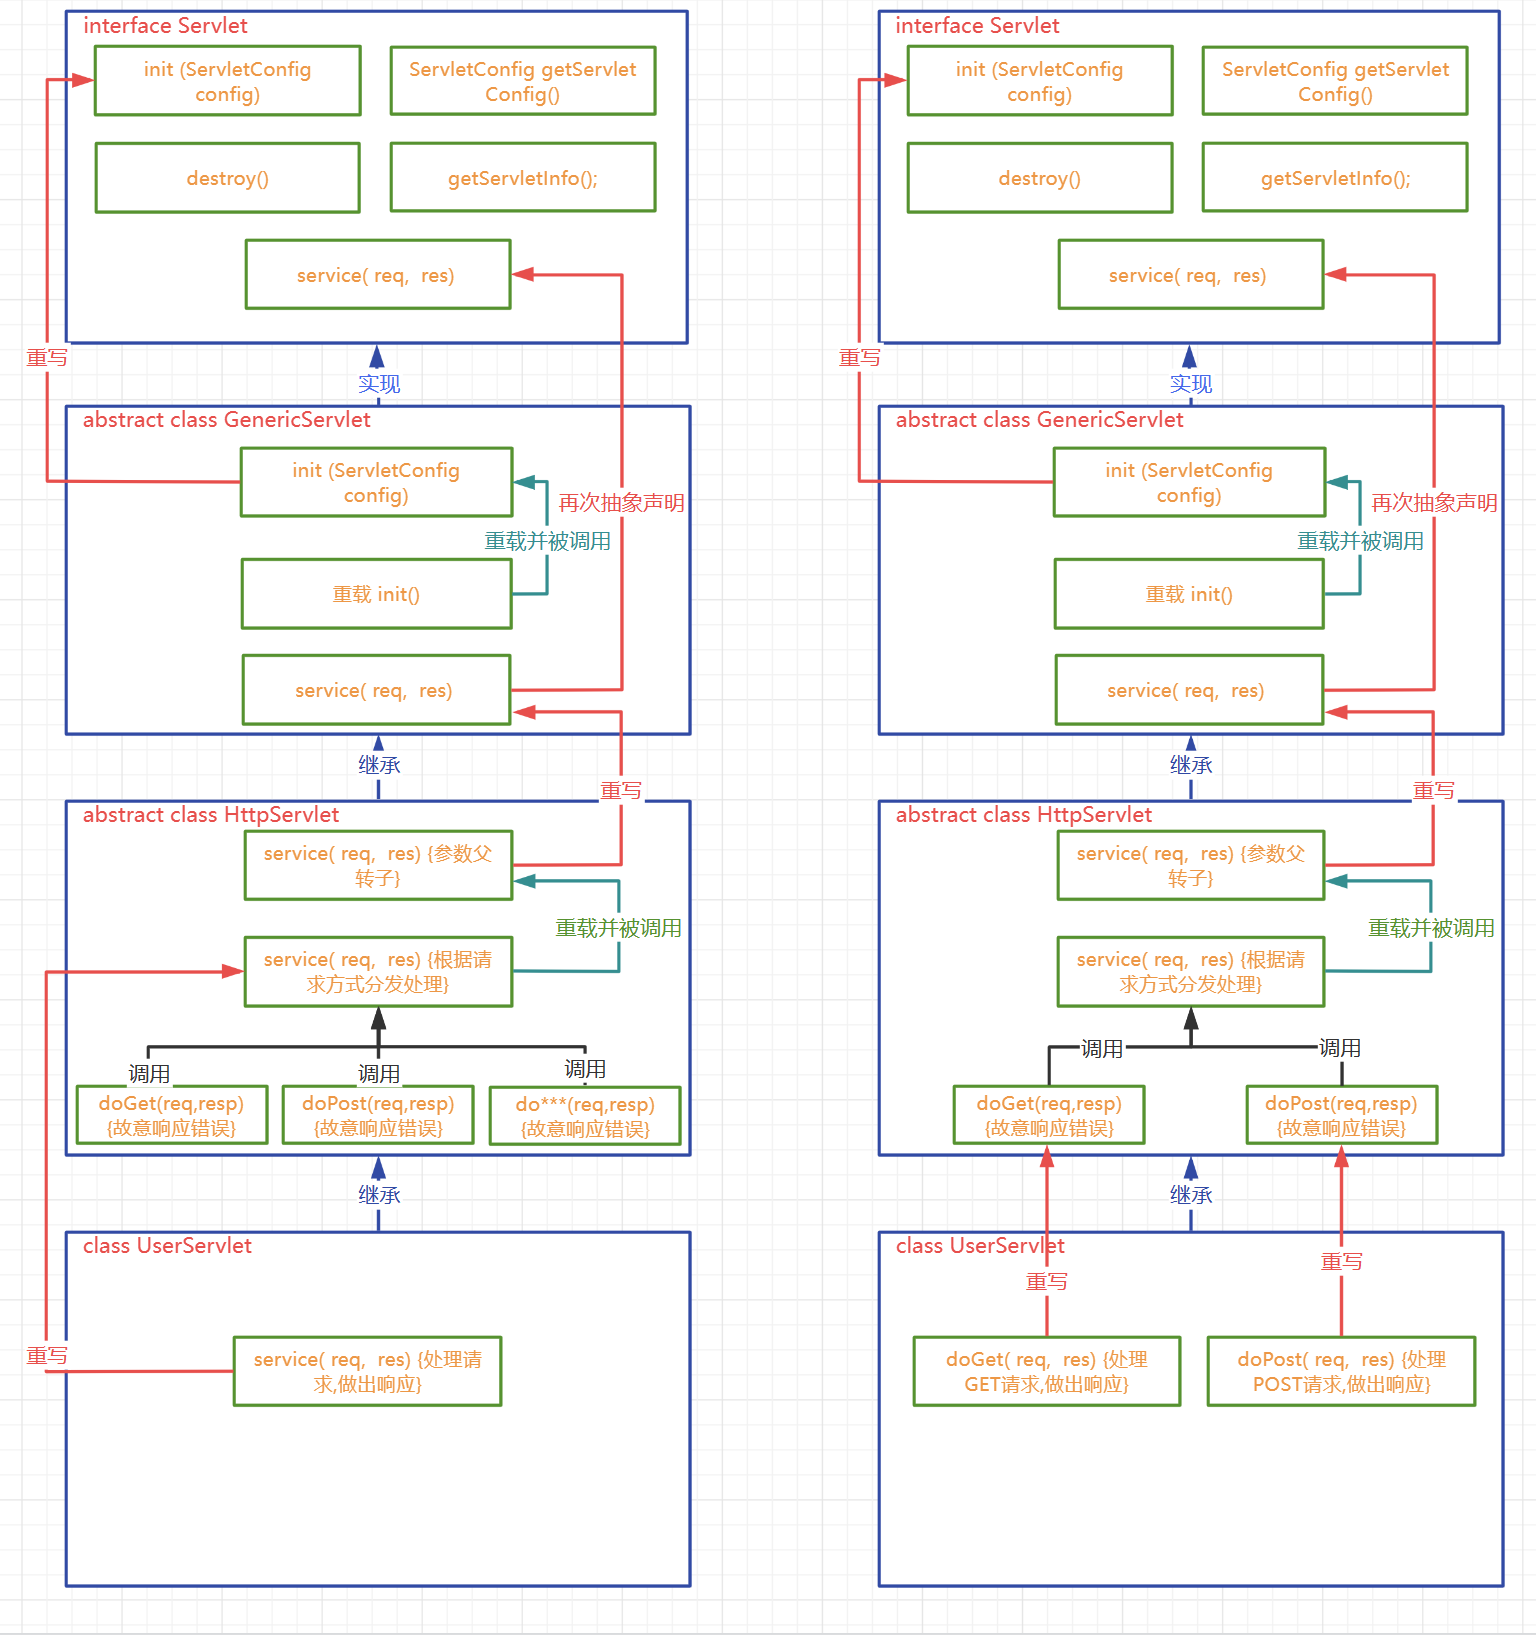
- Ŕç¬ň«Üń╣ëServletńŞş,ň┐ůÚí╗ŔŽüň»╣ňĄäšÉćŔ»ĚŠ▒éšÜ䊾╣Š│ĽŔ┐ŤŔíîÚçŹňćÖ
- ŔŽüń╣łÚçŹňćÖserviceŠľ╣Š│Ľ
- ŔŽüń╣łÚçŹňćÖdoGet/doPostŠľ╣Š│Ľ
ňůş ServletConfigňĺîServletContext
6.1 ServletConfigšÜäńŻ┐šöĘ
ServletConfigŠś»ń╗Çń╣ł
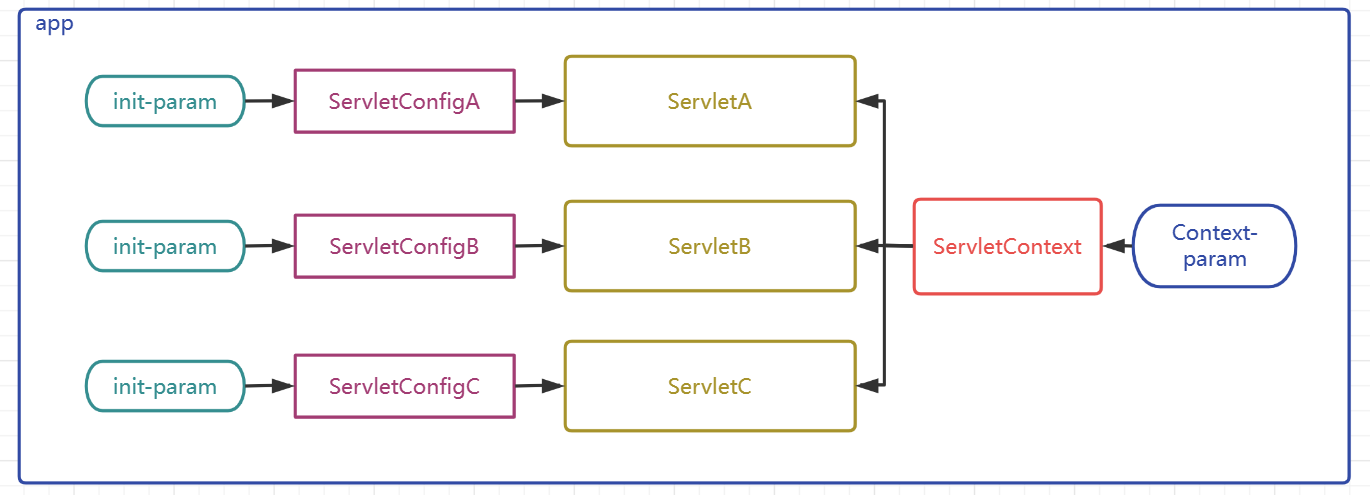
- ńŞ║ServletŠĆÉńżŤňłŁňžőÚůŹšŻ«ňĆ銼░šÜäńŞÇšžŹň»╣Ŕ▒í,Š»ĆńެServletÚ⯊ťëŔç¬ňĚ▒šőČšźőňö»ńŞÇšÜäServletConfigň»╣Ŕ▒í
- ň«╣ňÖĘń╝ÜńŞ║Š»ĆńެServletň«×ńżőňîľńŞÇńެServletConfigň»╣Ŕ▒í,ň╣ÂÚÇÜŔ┐çServletšöčňĹŻňĹĘŠťčšÜäinitŠľ╣Š│Ľń╝áňůąš╗ÖServletńŻťńŞ║ň▒׊Ǟ

ServletConfigŠś»ńŞÇńެŠÄąňĆú,ň«Üń╣ëń║ćňŽéńŞőAPI
package jakarta.servlet;
import java.util.Enumeration;
public interface ServletConfig {
    String getServletName();
    ServletContext getServletContext();
    String getInitParameter(String var1);
    Enumeration<String> getInitParameterNames();
}
| Šľ╣Š│ĽňÉŹ | ńŻťšöĘ |
|---|---|
| getServletName() | ŔÄĚňĆľ\ |
| getServletContext() | ŔÄĚňĆľServletContextň»╣Ŕ▒í |
| getInitParameter() | ŔÄĚňĆľÚůŹšŻ«ServletŠŚÂŔ«żšŻ«šÜäŃÇÄňłŁňžőňîľňĆ銼░ŃÇĆ´╝îŠá╣ŠŹ«ňÉŹňşŚŔÄĚňĆľňÇ╝ |
| getInitParameterNames() | ŔÄĚňĆľŠëÇŠťëňłŁňžőňîľňĆ銼░ňÉŹš╗䊳ɚÜäEnumerationň»╣Ŕ▒í |
ServletConfigŠÇÄń╣łšöĘ,ŠÁőŔ»Ľń╗úšáüňŽéńŞő
- ň«Üń╣ëServlet
public class ServletA extends HttpServlet {
@Override
protected void service(HttpServletRequest req, HttpServletResponse resp) throws ServletException, IOException {
ServletConfig servletConfig = this.getServletConfig();
// Šá╣ŠŹ«ňĆ銼░ňÉŹŔÄĚňĆľňŹĽńެňĆ銼░
String value = servletConfig.getInitParameter("param1");
System.out.println("param1:"+value);
// ŔÄĚňĆľŠëÇŠťëňĆ銼░ňÉŹ
Enumeration<String> parameterNames = servletConfig.getInitParameterNames();
// Ŕ┐şń╗úň╣ÂŔÄĚňĆľňĆ銼░ňÉŹ
while (parameterNames.hasMoreElements()) {
String paramaterName = parameterNames.nextElement();
System.out.println(paramaterName+":"+servletConfig.getInitParameter(paramaterName));
}
}
}
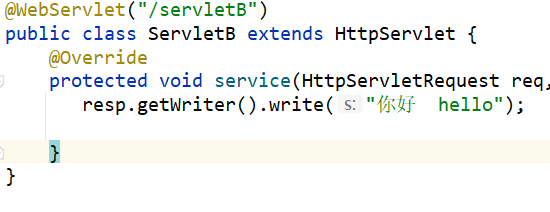
public class ServletB extends HttpServlet {
@Override
protected void service(HttpServletRequest req, HttpServletResponse resp) throws ServletException, IOException {
ServletConfig servletConfig = this.getServletConfig();
// Šá╣ŠŹ«ňĆ銼░ňÉŹŔÄĚňĆľňŹĽńެňĆ銼░
String value = servletConfig.getInitParameter("param1");
System.out.println("param1:"+value);
// ŔÄĚňĆľŠëÇŠťëňĆ銼░ňÉŹ
Enumeration<String> parameterNames = servletConfig.getInitParameterNames();
// Ŕ┐şń╗úň╣ÂŔÄĚňĆľňĆ銼░ňÉŹ
while (parameterNames.hasMoreElements()) {
String paramaterName = parameterNames.nextElement();
System.out.println(paramaterName+":"+servletConfig.getInitParameter(paramaterName));
}
}
}
- ÚůŹšŻ«Servlet
<servlet>
<servlet-name>ServletA</servlet-name>
<servlet-class>com.atguigu.servlet.ServletA</servlet-class>
<!--ÚůŹšŻ«ServletAšÜäňłŁňžőňĆ銼░-->
<init-param>
<param-name>param1</param-name>
<param-value>value1</param-value>
</init-param>
<init-param>
<param-name>param2</param-name>
<param-value>value2</param-value>
</init-param>
</servlet>
<servlet>
<servlet-name>ServletB</servlet-name>
<servlet-class>com.atguigu.servlet.ServletB</servlet-class>
<!--ÚůŹšŻ«ServletBšÜäňłŁňžőňĆ銼░-->
<init-param>
<param-name>param3</param-name>
<param-value>value3</param-value>
</init-param>
<init-param>
<param-name>param4</param-name>
<param-value>value4</param-value>
</init-param>
</servlet>
<servlet-mapping>
<servlet-name>ServletA</servlet-name>
<url-pattern>/servletA</url-pattern>
</servlet-mapping>
<servlet-mapping>
<servlet-name>ServletB</servlet-name>
<url-pattern>/servletB</url-pattern>
</servlet-mapping>
- Ŕ»ĚŠ▒éServletŠÁőŔ»Ľ
šĽą
6.2 ServletContextšÜäńŻ┐šöĘ
ServletContextŠś»ń╗Çń╣ł
- ServletContextň»╣Ŕ▒튝뚞░ňĹ╝ńŞ║ńŞŐńŞőŠľçň»╣Ŕ▒í,ŠłľŔÇůňĆźň║öšöĘňččň»╣Ŕ▒í(ňÉÄÚŁóš╗čńŞÇŔ«▓Ŕžúňččň»╣Ŕ▒í)
- ň«╣ňÖĘń╝ÜńŞ║Š»ĆńެappňłŤň╗║ńŞÇńެšőČšźőšÜäňö»ńŞÇšÜäServletContextň»╣Ŕ▒í
- ServletContextň»╣Ŕ▒íńŞ║ŠëÇŠťëšÜäServletŠëÇňů▒ń║ź
- ServletContextňĆ»ń╗ąńŞ║ŠëÇŠťëšÜäServletŠĆÉńżŤňłŁňžőÚůŹšŻ«ňĆ銼░
ServletContextŠÇÄń╣łšöĘ
- ÚůŹšŻ«ServletContextňĆ銼░
<?xml version="1.0" encoding="UTF-8"?>
<web-app xmlns="https://jakarta.ee/xml/ns/jakartaee"
         xmlns:xsi="http://www.w3.org/2001/XMLSchema-instance"
         xsi:schemaLocation="https://jakarta.ee/xml/ns/jakartaee https://jakarta.ee/xml/ns/jakartaee/web-app_5_0.xsd"
         version="5.0">

    <context-param>
        <param-name>paramA</param-name>
        <param-value>valueA</param-value>
    </context-param>
    <context-param>
        <param-name>paramB</param-name>
        <param-value>valueB</param-value>
    </context-param>
</web-app>
- ňťĘServletńŞşŔÄĚňĆľServletContextň╣ÂŔÄĚňĆľňĆ銼░
package com.atguigu.servlet;
import jakarta.servlet.ServletConfig;
import jakarta.servlet.ServletContext;
import jakarta.servlet.ServletException;
import jakarta.servlet.http.HttpServlet;
import jakarta.servlet.http.HttpServletRequest;
import jakarta.servlet.http.HttpServletResponse;
import java.io.IOException;
import java.util.Enumeration;
public class ServletA extends HttpServlet {
@Override
protected void service(HttpServletRequest req, HttpServletResponse resp) throws ServletException, IOException {
// ń╗ÄServletContextńŞşŔÄĚňĆľńŞ║ŠëÇŠťëšÜäServletňçćňĄçšÜäňĆ銼░
ServletContext servletContext = this.getServletContext();
String valueA = servletContext.getInitParameter("paramA");
System.out.println("paramA:"+valueA);
// ŔÄĚňĆľŠëÇŠťëňĆ銼░ňÉŹ
Enumeration<String> initParameterNames = servletContext.getInitParameterNames();
// Ŕ┐şń╗úň╣ÂŔÄĚňĆľňĆ銼░ňÉŹ
while (initParameterNames.hasMoreElements()) {
String paramaterName = initParameterNames.nextElement();
System.out.println(paramaterName+":"+servletContext.getInitParameter(paramaterName));
}
}
}
6.3 ServletContextňůÂń╗ľÚçŹŔŽüAPI
ŔÄĚňĆľŔÁäŠ║ÉšÜäšťčň«×ŔĚ»ňżä
String realPath = servletContext.getRealPath("ŔÁäŠ║ÉňťĘwebšŤ«ňŻĽńŞşšÜäŔĚ»ňżä");
- ńżőňŽéŠłĹń╗ČšÜ䚍«Šá犜»ÚťÇŔŽüŔÄĚňĆľÚí╣šŤ«ńŞşŠčÉńŞ¬ÚŁÖŠÇüŔÁäŠ║ÉšÜäŔĚ»ňżä´╝îńŞŹŠś»ňĚąšĘőšŤ«ňŻĽńŞşšÜäŔĚ»ňżä´╝îŔÇ»ÚâĘšŻ▓šŤ«ňŻĽńŞşšÜäŔĚ»ňżä´╝ŤŠłĹń╗ČňŽéŠ×ťšŤ┤ŠÄąŠőĚŔ┤ŁňůÂňťĘŠłĹń╗ČšöÁŔäĹńŞşšÜäň«îŠĽ┤ŔĚ»ňżäšÜäŔ»ŁňůÂň«×Šś»ŠťëÚŚ«ÚóśšÜä´╝îňŤáńŞ║ňŽéŠ×ťŔ»ąÚí╣šŤ«ń╗ąňÉÄÚâĘšŻ▓ňł░ňůČňĆŞŠťŹňŐíňÖĘńŞŐšÜäŔ»Ł´╝îŔĚ»ňżäŔé»ň«ÜŠś»ń╝ÜňĆĹšöčŠö╣ňĆśšÜä´╝îŠëÇń╗ąŠłĹń╗ČÚťÇŔŽüńŻ┐šöĘń╗úšáüňŐĘŠÇüŔÄĚňĆľŔÁäŠ║ÉšÜäšťčň«×ŔĚ»ňżä. ňƬŔŽüńŻ┐šöĘń║ćservletContextňŐĘŠÇüŔÄĚňĆľŔÁäŠ║ÉšÜäšťčň«×ŔĚ»ňżä´╝îÚéúń╣łŠŚáŔ«║Úí╣šŤ«šÜäÚâĘšŻ▓ŔĚ»ňżäňĆĹšöčń╗Çń╣łňĆśňîľ´╝îÚâŻń╝ÜňŐĘŠÇüŔÄĚňĆľÚí╣šŤ«Ŕ┐ÉŔíÂňÇÖšÜäň«×ÚÖůŔĚ»ňżä´╝îŠëÇń╗ąň░▒ńŞŹń╝ÜňĆĹšöčšö▒ń║ÄňćÖŠş╗šťčň«×ŔĚ»ňżäŔÇîň»╝Ŕç┤Úí╣šŤ«ÚâĘšŻ▓ńŻŹšŻ«Šö╣ňĆśň╝ĽňĆĹšÜäŔĚ»ňżäÚöÖŔ»»ÚŚ«Úóś
ŔÄĚňĆľÚí╣šŤ«šÜäńŞŐńŞőŠľçŔĚ»ňżä
String contextPath = servletContext.getContextPath();
- Úí╣šŤ«šÜäÚâĘšŻ▓ňÉŹšž░,ń╣čňĆźÚí╣šŤ«šÜäńŞŐńŞőŠľçŔĚ»ňżä,ňťĘÚâĘšŻ▓Ŕ┐ŤňůątomcatŠŚÂŠëÇńŻ┐šöĘšÜäŔĚ»ňżä,Ŕ»ąŔĚ»ňżäŠś»ňĆ»ŔâŻňĆĹšöčňĆśňîľšÜä,ÚÇÜŔ┐çŔ»ąAPIňŐĘŠÇüŔÄĚňĆľÚí╣šŤ«šťčň«×šÜäńŞŐńŞőŠľçŔĚ»ňżä,ňĆ»ń╗ąňŞ«ňŐꊳĹń╗ČŔžúňć│ńŞÇń║ŤňÉÄšź»ÚíÁÚŁóŠŞ▓ŠčôŠŐÇŠť»ŠłľŔÇůŔ»ĚŠ▒éŔŻČňĆĹňĺîňôŹň║öÚçŹň«ÜňÉĹńŞşšÜäŔĚ»ňżäÚŚ«Úóś
ňččň»╣Ŕ▒íšÜ䚍Şňů│API
- ňččň»╣Ŕ▒í: ńŞÇń║ŤšöĘń║ÄňşśňéĘŠĽ░ŠŹ«ňĺîń╝áÚÇ劼░ŠŹ«šÜäň»╣Ŕ▒í,ń╝áÚÇ劼░ŠŹ«ńŞŹňÉîšÜäŔîâňŤ┤,ŠłĹń╗Čšž░ń╣őńŞ║ńŞŹňÉîšÜäňčč,ńŞŹňÉîšÜäňččň»╣Ŕ▒íń╗úŔíĘńŞŹňÉîšÜäňčč,ňů▒ń║źŠĽ░ŠŹ«šÜäŔîâňŤ┤ń╣čńŞŹňÉî
- ServletContextń╗úŔíĘň║öšöĘ,ŠëÇń╗ąServletContextňččń╣čňĆźńŻťň║öšöĘňčč,Šś»webappńŞşŠťÇňĄžšÜäňčč,ňĆ»ń╗ąňťĘŠťČň║öšöĘňćůň«×šÄ░ŠĽ░ŠŹ«šÜäňů▒ń║źňĺîń╝áÚÇĺ
- webappńŞşšÜäńŞëňĄžňččň»╣Ŕ▒í,ňłćňłźŠś»ň║öšöĘňčč,ń╝ÜŔ»Łňčč,Ŕ»ĚŠ▒éňčč
ňÉÄš╗şŠłĹń╗Čń╝Üň░ćńŞëňĄžňččň»╣Ŕ▒íš╗čńŞÇŔ┐ŤŔíîŔ«▓ŔžúňĺîŠ╝öšĄ║,ńŞëňĄžňččň»╣Ŕ▒íÚâŻňůĚŠťëšÜäAPIňŽéńŞő
| API | ňŐčŔâŻŔžúÚçŐ |
|---|---|
| void setAttribute(String key,Object value); | ňÉĹňččńŞşňşśňéĘ/ń┐«Šö╣ŠĽ░ŠŹ« |
| Object getAttribute(String key); | ŔÄĚňżŚňččńŞşšÜ䊼░ŠŹ« |
| void removeAttribute(String key); | šž╗ÚÖĄňččńŞşšÜ䊼░ŠŹ« |
ńŞâ HttpServletRequest
7.1 HttpServletRequestš«Çń╗ő
HttpServletRequestŠś»ń╗Çń╣ł
- HttpServletRequestŠś»ńŞÇńެŠÄąňĆú,ňůšłÂŠÄąňĆúŠś»ServletRequest
- HttpServletRequestŠś»Tomcatň░ćŔ»ĚŠ▒éŠŐąŠľçŔŻČŠŹóň░üŔúůŔÇąšÜäň»╣Ŕ▒í,ňťĘTomcatŔ░âšöĘserviceŠľ╣Š│ĽŠŚÂń╝áňůą
- HttpServletRequestń╗úŔíĘň«óŠłĚšź»ňĆĹŠŁąšÜäŔ»ĚŠ▒é,ŠëÇŠťëŔ»ĚŠ▒éńŞşšÜäń┐íŠü»ÚâŻňĆ»ń╗ąÚÇÜŔ┐çŔ»ąň»╣Ŕ▒íŔÄĚňżŚ
7.2 HttpServletRequestňŞŞŔžüAPI
HttpServletRequestŠÇÄń╣łšöĘ
- ŔÄĚňĆľŔ»ĚŠ▒éŔíîń┐íŠü»šŤŞňů│(Šľ╣ň╝Ć,Ŕ»ĚŠ▒éšÜäurl,ňŹĆŔ««ňĆ՚볊ťČ)
| API | ňŐčŔâŻŔžúÚçŐ |
|---|---|
| StringBuffer getRequestURL(); | ŔÄĚňĆľň«óŠłĚšź»Ŕ»ĚŠ▒éšÜäurl |
| String getRequestURI(); | ŔÄĚňĆľň«óŠłĚšź»Ŕ»ĚŠ▒éÚí╣šŤ«ńŞşšÜäňůĚńŻôŔÁäŠ║É |
| int getServerPort(); | ŔÄĚňĆľň«óŠłĚšź»ňĆĹÚÇüŔ»ĚŠ▒銌šÜäšź»ňĆú |
| int getLocalPort(); | ŔÄĚňĆľŠťČň║öšöĘňťĘŠëÇňťĘň«╣ňÖĘšÜäšź»ňĆú |
| int getRemotePort(); | ŔÄĚňĆľň«óŠłĚšź»šĘőň║ĆšÜäšź»ňĆú |
| String getScheme(); | ŔÄĚňĆľŔ»ĚŠ▒éňŹĆŔ«« |
| String getProtocol(); | ŔÄĚňĆľŔ»ĚŠ▒éňŹĆŔ««ňĆ՚볊ťČňĆĚ |
| String getMethod(); | ŔÄĚňĆľŔ»ĚŠ▒銾╣ň╝Ć |
-
ŔÄĚňżŚŔ»ĚŠ▒éňĄ┤ń┐íŠü»šŤŞňů│ | API | ňŐčŔâŻŔžúÚçŐ | | ------------------------------------- | ---------------------- | | String getHeader(String headerName); | Šá╣ŠŹ«ňĄ┤ňÉŹšž░ŔÄĚňĆľŔ»ĚŠ▒éňĄ┤ | | Enumeration
getHeaderNames(); | ŔÄĚňĆľŠëÇŠťëšÜäŔ»ĚŠ▒éňĄ┤ňÉŹňşŚ | | String getContentType(); | ŔÄĚňĆľcontent-typeŔ»ĚŠ▒éňĄ┤ | -
ŔÄĚňżŚŔ»ĚŠ▒éňĆ銼░šŤŞňů│ | API | ňŐčŔâŻŔžúÚçŐ | | ------------------------------------------------------- | ------------------------------------ | | String getParameter(String parameterName); | Šá╣ŠŹ«Ŕ»ĚŠ▒éňĆ銼░ňÉŹŔÄĚňĆľŔ»ĚŠ▒éňŹĽńެňĆ銼░ňÇ╝ | | String[] getParameterValues(String parameterName); | Šá╣ŠŹ«Ŕ»ĚŠ▒éňĆ銼░ňÉŹŔÄĚňĆľŔ»ĚŠ▒éňĄÜńެňĆ銼░ňÇ╝ŠĽ░š╗ä | | Enumeration
getParameterNames(); | ŔÄĚňĆľŠëÇŠťëŔ»ĚŠ▒éňĆ銼░ňÉŹ | | Map -
ňůÂń╗ľAPI | API | ňŐčŔâŻŔžúÚçŐ | | -------------------------------------------- | --------------------------- | | String getServletPath(); | ŔÄĚňĆľŔ»ĚŠ▒éšÜäServletšÜ䊜áň░äŔĚ»ňżä | | ServletContext getServletContext(); | ŔÄĚňĆľServletContextň»╣Ŕ▒í | | Cookie[] getCookies(); | ŔÄĚňĆľŔ»ĚŠ▒éńŞşšÜäŠëÇŠťëcookie | | HttpSession getSession(); | ŔÄĚňĆľSessionň»╣Ŕ▒í | | void setCharacterEncoding(String encoding) ; | Ŕ«żšŻ«Ŕ»ĚŠ▒éńŻôňşŚšČŽÚŤć |
ňůź HttpServletResponse
8.1 HttpServletResponseš«Çń╗ő
HttpServletResponseŠś»ń╗Çń╣ł
- HttpServletResponseŠś»ńŞÇńެŠÄąňĆú,ňůšłÂŠÄąňĆúŠś»ServletResponse
- HttpServletResponseŠś»TomcatÚóäňůłňłŤň╗║šÜä,ňťĘTomcatŔ░âšöĘserviceŠľ╣Š│ĽŠŚÂń╝áňůą
- HttpServletResponseń╗úŔíĘň»╣ň«óŠłĚšź»šÜäňôŹň║ö,Ŕ»ąň»╣Ŕ▒íń╝ÜŔóźŔŻČŠŹóŠłÉňôŹň║öšÜäŠŐąŠľçňĆĹÚÇüš╗Öň«óŠłĚšź»,ÚÇÜŔ┐çŔ»ąň»╣Ŕ▒튳Ĺń╗ČňĆ»ń╗ąŔ«żšŻ«ňôŹň║öń┐íŠü»
8.2 HttpServletResponsešÜäňŞŞŔžüAPI
HttpServletRequestŠÇÄń╣łšöĘ
- Ŕ«żšŻ«ňôŹň║öŔíŞňů│
| API | ňŐčŔâŻŔžúÚçŐ |
|---|---|
| void setStatus(int code); | Ŕ«żšŻ«ňôŹň║öšŐŠÇüšáü |
- Ŕ«żšŻ«ňôŹň║öňĄ┤šŤŞňů│
| API | ňŐčŔâŻŔžúÚçŐ |
|---|---|
| void setHeader(String headerName, String headerValue); | Ŕ«żšŻ«/ń┐«Šö╣ňôŹň║öňĄ┤Úö«ňÇ╝ň»╣ |
| void setContentType(String contentType); | Ŕ«żšŻ«content-typeňôŹň║öňĄ┤ňĆŐňôŹň║öňşŚšČŽÚŤć(Ŕ«żšŻ«MIMEš▒╗ň×ő) |
- Ŕ«żšŻ«ňôŹň║öńŻôšŤŞňů│
| API | ňŐčŔâŻŔžúÚçŐ |
|---|---|
| PrintWriter getWriter() throws IOException; | ŔÄĚňżŚňÉĹňôŹň║öńŻôŠöżňůąń┐íŠü»šÜäňşŚšČŽŔżôňç║ŠÁü |
| ServletOutputStream getOutputStream() throws IOException; | ŔÄĚňżŚňÉĹňôŹň║öńŻôŠöżňůąń┐íŠü»šÜäňşŚŔŐéŔżôňç║ŠÁü |
| void setContentLength(int length); | Ŕ«żšŻ«ňôŹň║öńŻôšÜäňşŚŔŐéÚĽ┐ň║Ž,ňůÂň«×ň░▒Šś»ňťĘŔ«żšŻ«content-lengthňôŹň║öňĄ┤ |
- ňůÂń╗ľAPI
| API | ňŐčŔâŻŔžúÚçŐ |
|---|---|
| void sendError(int code, String message) throws IOException; | ňÉĹň«óŠłĚšź»ňôŹň║öÚöÖŔ»»ń┐íŠü»šÜ䊾╣Š│Ľ,ÚťÇŔŽüŠîçň«ÜňôŹň║öšáüňĺîňôŹň║öń┐íŠü» |
| void addCookie(Cookie cookie); | ňÉĹňôŹň║öńŻôńŞşňó×ňŐácookie |
| void setCharacterEncoding(String encoding); | Ŕ«żšŻ«ňôŹň║öńŻôňşŚšČŽÚŤć |
MIMEš▒╗ň×ő
- MIMEš▒╗ň×ő,ňĆ»ń╗ąšÉćŔžúńŞ║ŠľçŠíúš▒╗ň×ő,šöĘŠłĚŔíĘšĄ║ń╝áÚÇĺšÜ䊼░ŠŹ«Šś»ň▒×ń║Äń╗Çń╣łš▒╗ň×őšÜ䊾çŠíú
- ŠÁĆŔžłňÖĘňĆ»ń╗ąŠá╣ŠŹ«MIMEš▒╗ň×őňć│ň«ÜŔ»ąšöĘń╗Çń╣łŠáĚšÜ䊾╣ň╝ĆŔžúŠ×ÉŠÄąŠöÂňł░šÜäňôŹň║öńŻôŠĽ░ŠŹ«
- ňĆ»ń╗ąŔ┐ÖŠáĚšÉćŔžú: ňëŹňÉÄšź»ń║Ąń║劼░ŠŹ«ŠŚÂ,ňĹŐŔ»ëň»╣Šľ╣ňĆĹš╗Öň»╣Šľ╣šÜ䊜» html/css/js/ňŤżšëç/ňú░Úč│/ŔžćÚóĹ/... ...
- tomcat/conf/web.xmlńŞşÚůŹšŻ«ń║ćňŞŞŔžüŠľçń╗šÜäŠőôň▒ĽňÉŹňĺîMIMIEš▒╗ň×őšÜäň»╣ň║öňů│š│╗
- ňŞŞŔžüšÜäMIMEš▒╗ň×őńŞżńżőňŽéńŞő
| Šľçń╗Šőôň▒ĽňÉŹ | MIMEš▒╗ň×ő |
|---|---|
| .html | text/html |
| .css | text/css |
| .js | application/javascript |
| .png /.jpeg/.jpg/... ... | image/jpeg |
| .mp3/.mpe/.mpeg/ ... ... | audio/mpeg |
| .mp4 | video/mp4 |
| .m1v/.m1v/.m2v/.mpe/... ... | video/mpeg |
ń╣Ł Ŕ»ĚŠ▒éŔŻČňĆĹňĺîňôŹň║öÚçŹň«ÜňÉĹ
9.1 ŠŽéŔ┐░
ń╗Çń╣łŠś»Ŕ»ĚŠ▒éŔŻČňĆĹňĺîňôŹň║öÚçŹň«ÜňÉĹ
-
Ŕ»ĚŠ▒éŔŻČňĆĹňĺîňôŹň║öÚçŹň«ÜňÉĹŠś»webň║öšöĘńŞşÚŚ┤ŠÄąŔ«┐ÚŚ«Úí╣šŤ«ŔÁäŠ║ÉšÜäńŞĄšžŹŠëőŠ«Á,ń╣芜»ServletŠÄžňłÂÚíÁÚŁóŔĚ│ŔŻČšÜäńŞĄšžŹŠëőŠ«Á
-
Ŕ»ĚŠ▒éŔŻČňĆĹÚÇÜŔ┐çHttpServletRequestň«×šÄ░,ňôŹň║öÚçŹň«ÜňÉĹÚÇÜŔ┐çHttpServletResponseň«×šÄ░
-
Ŕ»ĚŠ▒éŔŻČňĆĹšöčŠ┤╗ńŞżńżő: ň╝áńŞëŠëżŠŁÄňŤŤňÇčÚĺ▒,ŠŁÄňŤŤŠ▓튝ë,ŠŁÄňŤŤŠëżšÄőń║ö,Ŕ«ęšÄőń║öňÇčš╗Öň╝áńŞë
- ňôŹň║öÚçŹň«ÜňÉĹšöčŠ┤╗ńŞżńżő:ň╝áńŞëŠëżŠŁÄňŤŤňÇčÚĺ▒,ŠŁÄňŤŤŠ▓튝ë,ŠŁÄňŤŤŔ«ęň╝áńŞëňÄ╗ŠëżšÄőń║ö,ň╝áńŞëŔç¬ňĚ▒ňćŹňÄ╗ŠëżšÄőń║öňÇčÚĺ▒
9.2 Ŕ»ĚŠ▒éŔŻČňĆĹ
Ŕ»ĚŠ▒éŔŻČňĆĹŔ┐ÉŔíîÚÇ╗ŔżĹňŤż
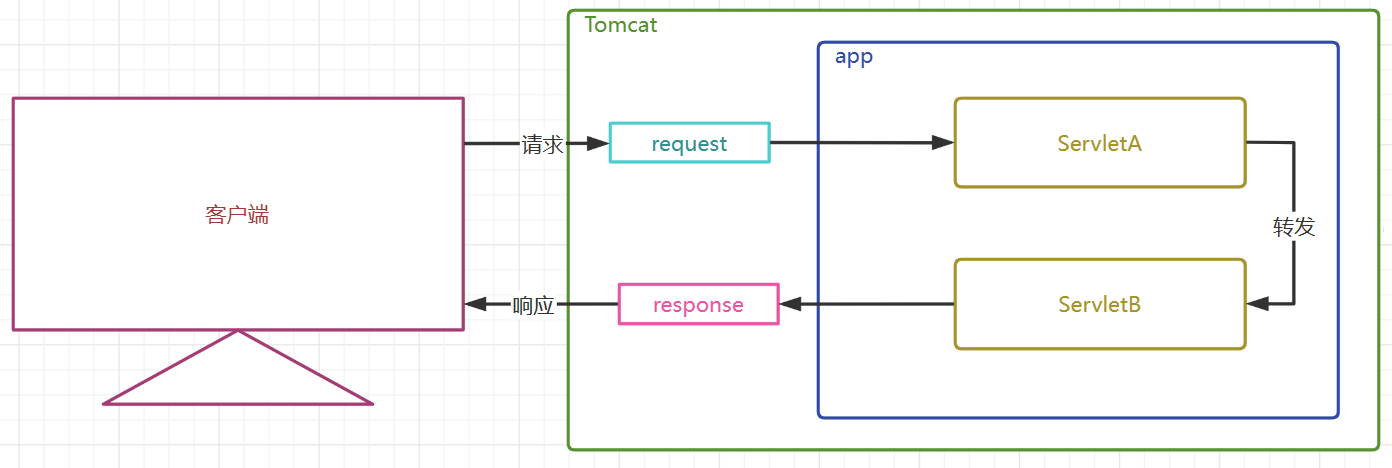
Ŕ»ĚŠ▒éŔŻČňĆĹšë╣šé╣(ŔâîŔ»Á)
- Ŕ»ĚŠ▒éŔŻČňĆĹÚÇÜŔ┐çHttpServletRequestň»╣Ŕ▒íŔÄĚňĆľŔ»ĚŠ▒éŔŻČňĆĹňÖĘň«×šÄ░
- Ŕ»ĚŠ▒éŔŻČňĆĹŠś»ŠťŹňŐíňÖĘňćůÚâĘšÜäŔíîńŞ║,ň»╣ň«óŠłĚšź»Šś»ň▒ĆŔöŻšÜä
- ň«óŠłĚšź»ňƬňĆĹÚÇüń║ćńŞÇŠČíŔ»ĚŠ▒é,ň«óŠłĚšź»ňť░ňŁÇŠáĆńŞŹňĆś
- ŠťŹňŐíšź»ňƬń║žšöčń║ćńŞÇň»╣Ŕ»ĚŠ▒éňĺîňôŹň║öň»╣Ŕ▒í,Ŕ┐ÖńŞÇň»╣Ŕ»ĚŠ▒éňĺîňôŹň║öň»╣Ŕ▒íń╝Üš╗žš╗şń╝áÚÇĺš╗ÖńŞőńŞÇńެŔÁäŠ║É
- ňŤáńŞ║ňůĘšĘőňƬŠťëńŞÇńެHttpServletRequsetň»╣Ŕ▒í,ŠëÇń╗ąŔ»ĚŠ▒éňĆ銼░ňĆ»ń╗ąń╝áÚÇĺ,Ŕ»ĚŠ▒éňččńŞşšÜ䊼░ŠŹ«ń╣čňĆ»ń╗ąń╝áÚÇĺ
- Ŕ»ĚŠ▒éŔŻČňĆĹňĆ»ń╗ąŔŻČňĆĹš╗ÖňůÂń╗ľServletňŐĘŠÇüŔÁäŠ║É,ń╣čňĆ»ń╗ąŔŻČňĆĹš╗ÖńŞÇń║ŤÚŁÖŠÇüŔÁäŠ║Éń╗ąň«×šÄ░ÚíÁÚŁóŔĚ│ŔŻČ
- Ŕ»ĚŠ▒éŔŻČňĆĹňĆ»ń╗ąŔŻČňĆĹš╗ÖWEB-INFńŞőňĆŚń┐ŁŠŐĄšÜäŔÁäŠ║É
- Ŕ»ĚŠ▒éŔŻČňĆĹńŞŹŔâŻŔŻČňĆĹňł░ŠťČÚí╣šŤ«ń╗ąňĄľšÜäňĄľÚâĘŔÁäŠ║É
Ŕ»ĚŠ▒éŔŻČňĆĹŠÁőŔ»Ľń╗úšáü
- ServletA
@WebServlet("/servletA")
public class ServletA extends HttpServlet {
@Override
protected void service(HttpServletRequest req, HttpServletResponse resp) throws ServletException, IOException {
// ŔÄĚňĆľŔ»ĚŠ▒éŔŻČňĆĹňÖĘ
// ŔŻČňĆĹš╗Öservlet ok
RequestDispatcher requestDispatcher = req.getRequestDispatcher("servletB");
// ŔŻČňĆĹš╗ÖńŞÇńެŔžćňŤżŔÁäŠ║É ok
//RequestDispatcher requestDispatcher = req.getRequestDispatcher("welcome.html");
// ŔŻČňĆĹš╗ÖWEB-INFńŞőšÜäŔÁäŠ║É ok
//RequestDispatcher requestDispatcher = req.getRequestDispatcher("WEB-INF/views/view1.html");
// ŔŻČňĆĹš╗ÖňĄľÚâĘŔÁäŠ║É no
//RequestDispatcher requestDispatcher = req.getRequestDispatcher("http://www.atguigu.com");
// ŔÄĚňĆľŔ»ĚŠ▒éňĆ銼░
String username = req.getParameter("username");
System.out.println(username);
// ňÉĹŔ»ĚŠ▒éňččńŞşŠĚ╗ňŐኼ░ŠŹ«
req.setAttribute("reqKey","requestMessage");
// ňüÜňç║ŔŻČňĆĹňŐĘńŻť
requestDispatcher.forward(req,resp);
}
}
- ServletB
@WebServlet("/servletB")
public class ServletB extends HttpServlet {
@Override
protected void service(HttpServletRequest req, HttpServletResponse resp) throws ServletException, IOException {
// ŔÄĚňĆľŔ»ĚŠ▒éňĆ銼░
String username = req.getParameter("username");
System.out.println(username);
// ŔÄĚňĆľŔ»ĚŠ▒éňččńŞşšÜ䊼░ŠŹ«
String reqMessage = (String)req.getAttribute("reqKey");
System.out.println(reqMessage);
// ňüÜňç║ňôŹň║ö
resp.getWriter().write("servletB response");
}
}
- Šëôň╝ÇŠÁĆŔžłňÖĘ,Ŕżôňůąń╗ąńŞőurlŠÁőŔ»Ľ
http://localhost:8080/web03_war_exploded/servletA?username=atguigu
9.3 ňôŹň║öÚçŹň«ÜňÉĹ
ňôŹň║öÚçŹň«ÜňÉĹŔ┐ÉŔíîÚÇ╗ŔżĹňŤż
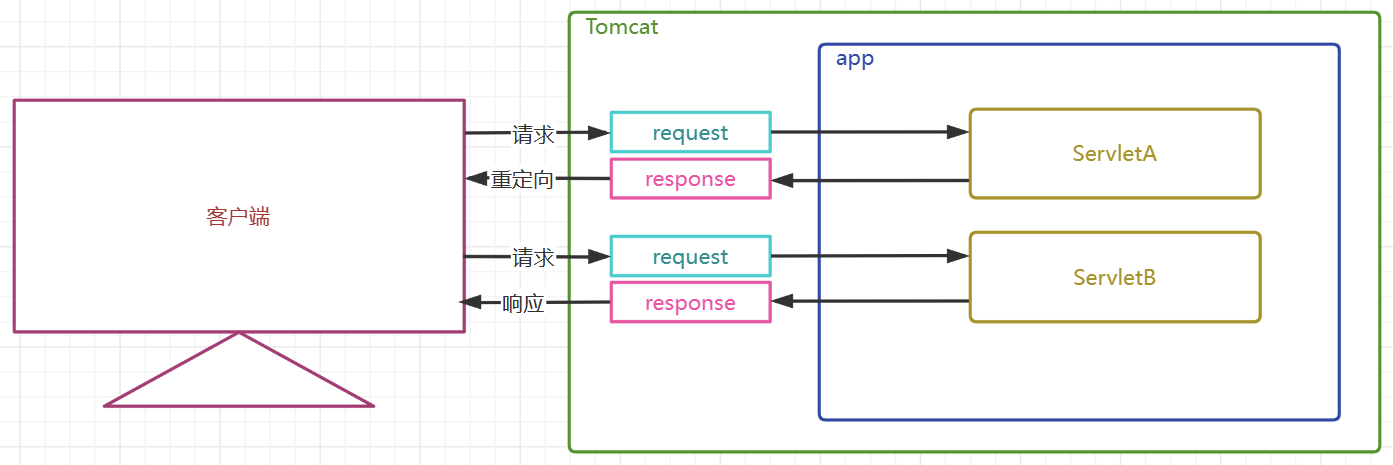
ňôŹň║öÚçŹň«ÜňÉĹšë╣šé╣(ŔâîŔ»Á)
- ňôŹň║öÚçŹň«ÜňÉĹÚÇÜŔ┐çHttpServletResponseň»╣Ŕ▒íšÜäsendRedirectŠľ╣Š│Ľň«×šÄ░
- ňôŹň║öÚçŹň«ÜňÉĹŠś»ŠťŹňŐíšź»ÚÇÜŔ┐ç302ňôŹň║öšáüňĺîŔĚ»ňżä,ňĹŐŔ»ëň«óŠłĚšź»Ŕç¬ňĚ▒ňÄ╗ŠëżňůÂń╗ľŔÁäŠ║É,Šś»ňťĘŠťŹňŐíšź»ŠĆÉšĄ║ńŞőšÜä,ň«óŠłĚšź»šÜäŔíîńŞ║
- ň«óŠłĚšź»Ŕç│ň░ĹňĆĹÚÇüń║ćńŞĄŠČíŔ»ĚŠ▒é,ň«óŠłĚšź»ňť░ňŁÇŠáĆŠś»ŔŽüňĆśňîľšÜä
- ŠťŹňŐíšź»ń║žšöčń║ćňĄÜň»╣Ŕ»ĚŠ▒éňĺîňôŹň║öň»╣Ŕ▒í,ńŞöŔ»ĚŠ▒éňĺîňôŹň║öň»╣Ŕ▒íńŞŹń╝Üń╝áÚÇĺš╗ÖńŞőńŞÇńެŔÁäŠ║É
- ňŤáńŞ║ňůĘšĘőń║žšöčń║ćňĄÜńެHttpServletRequsetň»╣Ŕ▒í,ŠëÇń╗ąŔ»ĚŠ▒éňĆ銼░ńŞŹňĆ»ń╗ąń╝áÚÇĺ,Ŕ»ĚŠ▒éňččńŞşšÜ䊼░ŠŹ«ń╣čńŞŹňĆ»ń╗ąń╝áÚÇĺ
- ÚçŹň«ÜňÉĹňĆ»ń╗ąŠś»ňůÂń╗ľServletňŐĘŠÇüŔÁäŠ║É,ń╣čňĆ»ń╗ąŠś»ńŞÇń║ŤÚŁÖŠÇüŔÁäŠ║Éń╗ąň«×šÄ░ÚíÁÚŁóŔĚ│ŔŻČ
- ÚçŹň«ÜňÉĹńŞŹňĆ»ń╗ąňł░š╗ÖWEB-INFńŞőňĆŚń┐ŁŠŐĄšÜäŔÁäŠ║É
- ÚçŹň«ÜňÉĹňĆ»ń╗ąňł░ŠťČÚí╣šŤ«ń╗ąňĄľšÜäňĄľÚâĘŔÁäŠ║É
ňôŹň║öÚçŹň«ÜňÉĹŠÁőŔ»Ľń╗úšáü
- ServletA
@WebServlet("/servletA")
public class ServletA extends HttpServlet {
@Override
protected void service(HttpServletRequest req, HttpServletResponse resp) throws ServletException, IOException {
// ŔÄĚňĆľŔ»ĚŠ▒éňĆ銼░
String username = req.getParameter("username");
System.out.println(username);
// ňÉĹŔ»ĚŠ▒éňččńŞşŠĚ╗ňŐኼ░ŠŹ«
req.setAttribute("reqKey","requestMessage");
// ňôŹň║öÚçŹň«ÜňÉĹ
// ÚçŹň«ÜňÉĹňł░servletňŐĘŠÇüŔÁäŠ║É OK
resp.sendRedirect("servletB");
// ÚçŹň«ÜňÉĹňł░ŔžćňŤżÚŁÖŠÇüŔÁäŠ║É OK
//resp.sendRedirect("welcome.html");
// ÚçŹň«ÜňÉĹňł░WEB-INFńŞőšÜäŔÁäŠ║É NO
//resp.sendRedirect("WEB-INF/views/view1");
// ÚçŹň«ÜňÉĹňł░ňĄľÚâĘŔÁäŠ║É
//resp.sendRedirect("http://www.atguigu.com");
}
}
- ServletB
@WebServlet("/servletB")
public class ServletB extends HttpServlet {
@Override
protected void service(HttpServletRequest req, HttpServletResponse resp) throws ServletException, IOException {
// ŔÄĚňĆľŔ»ĚŠ▒éňĆ銼░
String username = req.getParameter("username");
System.out.println(username);
// ŔÄĚňĆľŔ»ĚŠ▒éňččńŞşšÜ䊼░ŠŹ«
String reqMessage = (String)req.getAttribute("reqKey");
System.out.println(reqMessage);
// ňüÜňç║ňôŹň║ö
resp.getWriter().write("servletB response");
}
}
- Šëôň╝ÇŠÁĆŔžłňÖĘ,Ŕżôňůąń╗ąńŞőurlŠÁőŔ»Ľ
http://localhost:8080/web03_war_exploded/servletA?username=atguigu
ňŹü webń╣▒šáüňĺîŔĚ»ňżäÚŚ«ÚóśŠÇ╗š╗ô
10.1 ń╣▒šáüÚŚ«Úóś
ń╣▒šáüÚŚ«Úóśń║žšöčšÜäŠá╣ŠťČňÄčňŤáŠś»ń╗Çń╣ł
- ŠĽ░ŠŹ«šÜäš╝ľšáüňĺîŔžúšáüńŻ┐šöĘšÜäńŞŹŠś»ňÉîńŞÇńެňşŚšČŽÚŤć
- ńŻ┐šöĘń║ćńŞŹŠö»ŠîüŠčÉńެŔ»şŔĘÇŠľçňşŚšÜäňşŚšČŽÚŤć
ňÉäńެňşŚšČŽÚŤćšÜäňů╝ň«╣ŠÇž

- šö▒ńŞŐňŤżňżŚščą,ńŞŐŔ┐░ňşŚšČŽÚŤćÚâŻňů╝ň«╣ń║ćASCII
- ASCIIńŞşŠťëń╗Çń╣ł? Ŕő▒ŠľçňşŚŠ»ŹňĺîńŞÇń║ŤÚÇÜňŞŞńŻ┐šöĘšÜäšČŽňĆĚ,ŠëÇń╗ąŔ┐Öń║ŤńŞťŔą┐ŠŚáŔ«║ńŻ┐šöĘń╗Çń╣łňşŚšČŽÚŤćÚâŻńŞŹń╝Üń╣▒šáü
10.1.1 HTMLń╣▒šáüÚŚ«Úóś
Ŕ«żšŻ«Úí╣šŤ«Šľçń╗šÜäňşŚšČŽÚŤćŔŽüńŻ┐šöĘńŞÇńެŠö»ŠîüńŞşŠľçšÜäňşŚšČŽÚŤć
- ŠčąšťőňŻôň돊ľçń╗šÜäňşŚšČŽÚŤć

- ŠčąšťőÚí╣šŤ«ňşŚšČŽÚŤć ÚůŹšŻ«,ň░ćGlobal Encoding ňůĘň▒ÇňşŚšČŽÚŤć,Project Encoding Úí╣šŤ«ňşŚšČŽÚŤć, Properties Files ň▒׊ǞÚůŹšŻ«Šľçń╗ÂňşŚšČŽÚŤćŔ«żšŻ«ńŞ║UTF-8

ňŻôňëŹŔžćňŤżŠľçń╗šÜäňşŚšČŽÚŤćÚÇÜŔ┐ç ŠŁąňĹ՚蹊ÁĆŔžłňÖĘÚÇÜŔ┐çń╗Çń╣łňşŚšČŽÚŤćŠŁąŔžúŠ×ÉňŻôň돊ľçń╗Â
<!DOCTYPE html>
<html lang="en">
<head>
<meta charset="UTF-8">
<title>Title</title>
</head>
<body>
ńŞşŠľç
</body>
</html>
10.1.2 TomcatŠÄžňłÂňĆ░ń╣▒šáü
ňťĘtomcat10.1.7Ŕ┐ÖńެšëłŠťČńŞş,ń┐«Šö╣ tomcat/conf/logging.propertiesńŞş,ŠëÇŠťëšÜäUTF-8ńŞ║GBKňŹ│ňĆ»
- ń┐«Šö╣ňëŹ

- ń┐«Šö╣ňÉÄ

- ÚçŹňÉ»ŠÁőŔ»Ľ


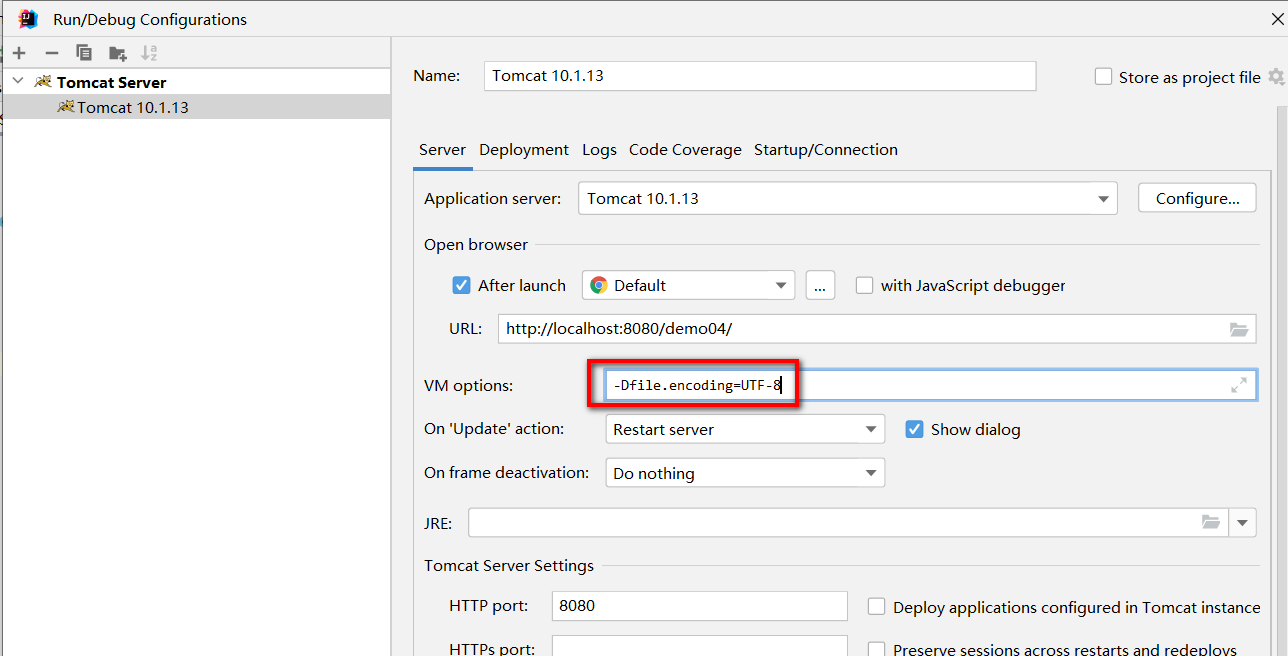
soutń╣▒šáüÚŚ«Úóś,Ŕ«żšŻ«JVMňŐáŔŻŻ.classŠľçń╗ŠŚÂńŻ┐šöĘUTF-8ňşŚšČŽÚŤć
- Ŕ«żšŻ«ŔÖÜŠő芝║ňŐáŔŻŻ.classŠľçń╗šÜäňşŚšČŽÚŤćňĺîš╝ľŔ»ĹŠŚÂńŻ┐šöĘšÜäňşŚšČŽÚŤćńŞÇŔç┤
10.1.3 Ŕ»ĚŠ▒éń╣▒šáüÚŚ«Úóś
10.1.3.1 GETŔ»ĚŠ▒éń╣▒šáü
GETŔ»ĚŠ▒銾╣ň╝Ćń╣▒šáüňłćŠ×É
- GETŠľ╣ň╝ĆŠĆÉń║ĄňĆ銼░šÜ䊾╣ň╝ĆŠś»ň░ćňĆ銼░Šöżňł░URLňÉÄÚŁó,ňŽéŠ×ťńŻ┐šöĘšÜäńŞŹŠś»UTF-8,Úéúń╣łń╝Üň»╣ňĆ銼░Ŕ┐ŤŔíîURLš╝ľšáüňĄäšÉć
- HTMLńŞşšÜä ňŻ▒ňôŹń║ćGETŠľ╣ň╝ĆŠĆÉń║ĄňĆ銼░šÜäURLš╝ľšáü
- tomcat10.1.7šÜäURIš╝ľšáüÚ╗śŔ«ĄńŞ║ UTF-8
- ňŻôGETŠľ╣ň╝ĆŠĆÉń║ĄšÜäňĆ銼░URLš╝ľšáüňĺîtomcat10.1.7Ú╗śŔ«ĄšÜäURIš╝ľšáüńŞŹńŞÇŔç┤ŠŚÂ,ň░▒ń╝Üňç║šÄ░ń╣▒šáü
GETŔ»ĚŠ▒銾╣ň╝Ćń╣▒šáüŠ╝öšĄ║
- ŠÁĆŔžłňÖĘŔžúŠ×ÉšÜ䊾çŠíúšÜä

- GETŠľ╣ň╝ĆŠĆÉń║ĄŠŚ�,ń╝Üň»╣ŠĽ░ŠŹ«Ŕ┐ŤŔíîURLš╝ľšáüňĄäšÉć ,Šś»ň░ćGBK ŔŻČšáüńŞ� "šÖżňłćňĆĚšáü"

- tomcat10.1.7 Ú╗śŔ«ĄńŻ┐šöĘUTF-8ň»╣URIŔ┐ŤŔíîŔžúŠ×É,ÚÇኳÉňëŹňÉÄšź»ńŻ┐šöĘšÜäňşŚšČŽÚŤćńŞŹńŞÇŔç�,ňç║šÄ░ń╣▒šáü

GETŔ»ĚŠ▒銾╣ň╝Ćń╣▒šáüŔžúňć│
- Šľ╣ň╝Ć1 :Ŕ«żšŻ«GETŠľ╣ň╝ĆŠĆÉń║ĄšÜäš╝ľšáüňĺîTomcat10.1.7šÜäURIÚ╗śŔ«ĄŔžúŠ×Éš╝ľšáüńŞÇŔç┤ňŹ│ňĆ� (ŠÄĘŔŹÉ)


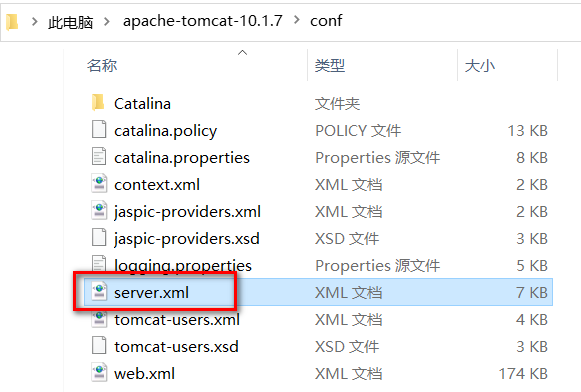
- Šľ╣ň╝Ć2 : Ŕ«żšŻ«Tomcat10.1.7šÜäURIŔžúŠ×ÉňşŚšČŽÚŤćňĺîGETŔ»ĚŠ▒éňĆĹÚÇüŠŚÂŠëÇńŻ┐šöĘURLŔŻČšáüŠŚÂšÜäňşŚšČŽÚŤćńŞÇŔç┤ňŹ│ňĆ�,ń┐«Šö╣conf/server.xmlńŞ� Connecter ŠĚ╗ňŐá URIEncoding="GBK" (ńŞŹŠÄĘŔŹ�)

10.1.3.2 POSTŠľ╣ň╝ĆŔ»ĚŠ▒éń╣▒šáü
POSTŔ»ĚŠ▒銾╣ň╝Ćń╣▒šáüňłćŠ×É
- POSTŔ»ĚŠ▒éň░ćňĆ銼░ŠöżňťĘŔ»ĚŠ▒éńŻôńŞşŔ┐ŤŔíîňĆĹÚÇ�
- Ŕ»ĚŠ▒éńŻôńŻ┐šöĘšÜäňşŚšČŽÚŤćňĆŚňł░ń║ć šÜäňŻ▒ňô�
- Tomcat10.1.7 Ú╗śŔ«ĄńŻ┐šöĘUTF-8ňşŚšČŽÚŤćň»╣Ŕ»ĚŠ▒éńŻôŔ┐ŤŔíîŔžúŠ×�
- ňŽéŠ×ťŔ»ĚŠ▒éńŻôšÜäURLŔŻČšáüňĺîTomcatšÜäŔ»ĚŠ▒éńŻôŔžúŠ×Éš╝ľšáüńŞŹńŞÇŔç�,ň░▒ň«╣Šśôňç║šÄ░ń╣▒šá�
POSTŠľ╣ň╝Ćń╣▒šáüŠ╝öšĄ║
- POSTŔ»ĚŠ▒éŔ»ĚŠ▒éńŻôňĆŚňł░ń║ć šÜäňŻ▒ňô�

- Ŕ»ĚŠ▒éńŻôńŞş,ň░ćGBKŠĽ░ŠŹ«Ŕ┐ŤŔíî URLš╝ľšáü

- ňÉÄšź»Ú╗śŔ«ĄńŻ┐šöĘUTF-8ŔžúŠ×ÉŔ»ĚŠ▒éńŻ�,ňç║šÄ░ňşŚšČŽÚŤćńŞŹńŞÇŔç�,ň»╝Ŕç┤ń╣▒šáü

POSTŔ»ĚŠ▒銾╣ň╝Ćń╣▒šáüŔžúňć│
- Šľ╣ň╝Ć1 : Ŕ»ĚŠ▒銌�,ńŻ┐šöĘUTF-8ňşŚšČŽÚŤćŠĆÉń║ĄŔ»ĚŠ▒éńŻô (ŠÄĘŔŹÉ)


- Šľ╣ň╝Ć2 : ňÉÄšź»ňťĘŔÄĚňĆľňĆ銼░ňëŹ,Ŕ«żšŻ«ŔžúŠ×ÉŔ»ĚŠ▒éńŻôńŻ┐šöĘšÜäňşŚšČŽÚŤćňĺîŔ»ĚŠ▒éňĆĹÚÇüŠŚÂńŻ┐šöĘšÜäňşŚšČŽÚŤćńŞÇŔç� (ńŞŹŠÄĘŔŹ�)

10.1.3 ňôŹň║öń╣▒šáüÚŚ«Úóś
ňôŹň║öń╣▒šáüňłćŠ×É
- ňťĘTomcat10.1.7ńŞ�,ňÉĹňôŹň║öńŻôńŞşŠöżňůąšÜ䊼░ŠŹ«Ú╗śŔ«ĄńŻ┐šöĘń║ćňĚąšĘőš╝ľšá� UTF-8
- ŠÁĆŔžłňÖĘňťĘŠÄąŠöÂňôŹň║öń┐íŠü»ŠŚ�,ńŻ┐šöĘń║ćńŞŹňÉîšÜäňşŚšČŽÚŤćŠłľŔÇůŠś»ńŞŹŠö»ŠîüńŞşŠľçšÜäňşŚšČŽÚŤćň░▒ń╝Üňç║šÄ░ń╣▒šá�
ňôŹň║öń╣▒šáüŠ╝öšĄ║
- ŠťŹňŐíšź»ÚÇÜŔ┐çresponseň»╣Ŕ▒íňÉĹňôŹň║öńŻôŠĚ╗ňŐኼ░ŠŹ«
- ŠÁĆŔžłňÖĘŠÄąŠöŠĽ░ŠŹ«ŔžúŠ×Éń╣▒šá�

ňôŹň║öń╣▒šáüŔžúňć│
-
Šľ╣ň╝Ć1 : ŠëőňŐĘŔ«żň«ÜŠÁĆŔžłňÖĘň»╣ŠťČŠČíňôŹň║öńŻôŔžúŠ×ÉŠŚÂńŻ┐šöĘšÜäňşŚšČŽÚŤć(ńŞŹŠÄĘŔŹ�)
- edgeňĺ� chromeŠÁĆŔžłňÖĘŠ▓튝ëŠĆÉńżŤšŤ┤ŠÄąšÜ䊻öŔżâŠľ╣ńż┐šÜäňůąňĆ�,ńŞŹŠľ╣ńż�
-
Šľ╣ň╝Ć2: ňÉÄšź»ÚÇÜŔ┐çŔ«żšŻ«ňôŹň║öńŻôšÜäňşŚšČŽÚŤćňĺîŠÁĆŔžłňÖĘŔžúŠ×ÉňôŹň║öńŻôšÜäÚ╗śŔ«ĄňşŚšČŽÚŤćńŞÇŔç�(ńŞŹŠÄĘŔŹ�)

Šľ╣ň╝Ć3: ÚÇÜŔ┐çŔ«żšŻ«content-typeňôŹň║öňĄ�,ňĹŐŔ»ëŠÁĆŔžłňÖĘń╗ąŠîçň«ÜšÜäňşŚšČŽÚŤćŔžúŠ×ÉňôŹň║öńŻ�(ŠÄĘŔŹÉ)


10.2 ŔĚ»ňżäÚŚ«Úóś
šŤŞň»╣ŔĚ»ňżäňĺîš╗Łň»╣ŔĚ»ňż�
-
šŤŞň»╣ŔĚ»ňżä
- šŤŞň»╣ŔĚ»ňżäšÜäŔžäňłÖŠś»: ń╗ąňŻôňëŹŔÁäŠ║ÉŠëÇňťĘšÜäŔĚ»ňżäńŞ║ňç║ňĆĹšé╣ňÄ╗ň»╗ŠëżšŤ«ŠáçŔÁäŠ║�
- šŤŞň»╣ŔĚ»ňżäńŞŹń╗ą / ň╝ÇňĄ�
- ňťĘfileňŹĆŔ««ńŞ�,ńŻ┐šöĘšÜ䊜»šúüšŤśŔĚ»ňżä
- ňťĘhttpňŹĆŔ««ńŞ�,ńŻ┐šöĘšÜ䊜»urlŔĚ»ňżä
- šŤŞň»╣ŔĚ»ňżäńŞşňĆ»ń╗ąńŻ┐šö� ./ŔíĘšĄ║ňŻôňëŹŔÁäŠ║ÉŠëÇňťĘŔĚ»ňż�,ňĆ»ń╗ąšťüšĽąńŞŹňćÖ
- šŤŞň»╣ŔĚ»ňżäńŞşňĆ»ń╗ąńŻ┐šö�../ŔíĘšĄ║ňŻôňëŹŔÁäŠ║ÉŠëÇňťĘŔĚ»ňżäšÜäńŞŐńŞÇň▒éŔĚ»ňż�,ÚťÇŔŽüŠŚÂŔŽüŠëőňŐĘŠĚ╗ňŐ�
-
š╗Łň»╣ŔĚ»ňżä
- š╗Łň»╣ŔĚ»ňżäšÜäŔžäňłÖŠś»: ńŻ┐šöĘń╗ąńŞÇńެňŤ║ň«ÜšÜäŔĚ»ňżäňüÜňç║ňç║ňĆĹšé╣ňÄ╗ň»╗ŠëżšŤ«ŠáçŔÁäŠ║É,ňĺîňŻôňëŹŔÁäŠ║ÉŠëÇňťĘšÜäŔĚ»ňżäŠ▓튝ëňů│š│╗
- š╗Łň»╣ŔĚ»ňżäŔŽüń╗ą/ ň╝ÇňĄ�
- š╗Łň»╣ŔĚ»ňżäšÜäňćÖŠ│ĽńŞş,ńŞŹń╗ąňŻôňëŹŔÁäŠ║ÉšÜäŠëÇňťĘŔĚ»ňżäńŞ║ňç║ňĆĹšé�,ŠëÇń╗ąńŞŹń╝Üňç║šÄ� ./ ňĺ�../
- ńŞŹňÉîšÜäÚí╣šŤ«ňĺîńŞŹňÉîšÜäňŹĆŔ««ńŞő,š╗Łň»╣ŔĚ»ňżäšÜäňč║šíÇńŻŹšŻ«ňĆ»ŔâŻńŞŹňÉî,ŔŽüÚÇÜŔ┐çŠÁőŔ»Ľší«ň«Ü
- š╗Łň»╣ŔĚ»ňżäšÜäňąŻňĄäň░▒Šś�:ŠŚáŔ«║ňŻôňëŹŔÁäŠ║ÉńŻŹšŻ«ňťĘňô¬,ň»╗ŠëżšŤ«ŠáçŔÁäŠ║ÉŔĚ»ňżäšÜäňćÖŠ│ĽÚâŻńŞÇŔç�
- ň║öšöĘňť║ŠÖ»
- ň돚ź»ń╗úšáüńŞ�,href src action šşëň▒׊Ç�
- Ŕ»ĚŠ▒éŔŻČňĆĹňĺîÚçŹň«ÜňÉĹńŞşšÜäŔĚ»ňżä
10.2.1 ň돚ź»ŔĚ»ňżäÚŚ«Úóś
ň돚ź»Úí╣šŤ«š╗ôŠ×ä
10.2.1.1 šŤŞň»╣ŔĚ»ňżäŠâůňćÁňłćŠ×É
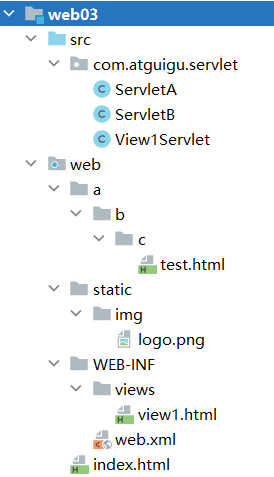
šŤŞň»╣ŔĚ»ňżäŠâůňćÁ1:web/index.htmlńŞşň╝Ľňůąweb/static/img/logo.png
- Ŕ«┐ÚŚ«index.htmlšÜäurlńŞ� : http://localhost:8080/web03_war_exploded/index.html
- ňŻôňëŹŔÁäŠ║ÉńŞ� : index.html
- ňŻôňëŹŔÁäŠ║ÉšÜäŠëÇňťĘŔĚ»ňżäńŞ║ : http://localhost:8080/web03_war_exploded/
- ŔŽüŔÄĚňĆľšÜ䚍«ŠáçŔÁäŠ║ÉurlńŞ� : http://localhost:8080/web03_war_exploded/static/img/logo.png
- index.htmlńŞşň«Üń╣ëšÜäń║� :
<img src="static/img/logo.png"/> - ň»╗ŠëżŠľ╣ň╝Ćň░▒Šś»ňťĘňŻôňëŹŔÁäŠ║ÉŠëÇňťĘŔĚ»ňż�(http://localhost:8080/web03_war_exploded/)ňÉÄŠő╝ŠÄąsrcň▒׊ǞňÇ�(static/img/logo.png),ŠşúňąŻŠś»šŤ«ŠáçŔÁäŠ║ÉŠşúňŞŞŔÄĚňĆľšÜäurl(http://localhost:8080/web03_war_exploded/static/img/logo.png)
<!DOCTYPE html>
<html lang="en">
<head>
    <meta charset="UTF-8">
    <title>Title</title>
</head>
<body>

    <img src="static/img/logo.png">
</body>
</html>
šŤŞň»╣ŔĚ»ňżäŠâůňćÁ2:web/a/b/c/test.htmlńŞşň╝Ľňůąweb/static/img/logo.png
- Ŕ«┐ÚŚ«test.htmlšÜäurlńŞ� : http://localhost:8080/web03_war_exploded/a/b/c/test.html
- ňŻôňëŹŔÁäŠ║ÉńŞ� : test.html
- ňŻôňëŹŔÁäŠ║ÉšÜäŠëÇňťĘŔĚ»ňżäńŞ║ : http://localhost:8080/web03_war_exploded/a/b/c/
- ŔŽüŔÄĚňĆľšÜ䚍«ŠáçŔÁäŠ║ÉurlńŞ� : http://localhost:8080/web03_war_exploded/static/img/logo.png
- test.htmlńŞşň«Üń╣ëšÜäń║� :
<img src="../../../static/img/logo.png"/> - ň»╗ŠëżŠľ╣ň╝Ćň░▒Šś»ňťĘňŻôňëŹŔÁäŠ║ÉŠëÇňťĘŔĚ»ňż�(http://localhost:8080/web03_war_exploded/a/b/c/)ňÉÄŠő╝ŠÄąsrcň▒׊ǞňÇ�(../../../static/img/logo.png),ňůÂńŞş ../ňĆ»ń╗ąŠŐÁŠÂłńŞÇň▒éŔĚ»ňż�,ŠşúňąŻŠś»šŤ«ŠáçŔÁäŠ║ÉŠşúňŞŞŔÄĚňĆľšÜäurl(http://localhost:8080/web03_war_exploded/static/img/logo.png)
<!DOCTYPE html>
<html lang="en">
<head>
<meta charset="UTF-8">
<title>Title</title>
</head>
<body>
<!-- ../ń╗úŔíĘńŞŐńŞÇň▒éŔĚ»ňż� -->
<img src="../../../static/img/logo.png">
</body>
</html>
šŤŞň»╣ŔĚ»ňżäŠâůňćÁ3:web/WEB-INF/views/view1.htmlńŞşň╝Ľňůąweb/static/img/logo.png
- view1.htmlňťĘWEB-INFńŞ�,ÚťÇŔŽüÚÇÜŔ┐çServletŔ»ĚŠ▒éŔŻČňĆĹŔÄĚňżŚ
@WebServlet("/view1Servlet")
public class View1Servlet extends HttpServlet {
    @Override
    protected void service(HttpServletRequest req, HttpServletResponse resp) throws ServletException, IOException {
        RequestDispatcher requestDispatcher = req.getRequestDispatcher("WEB-INF/views/view1.html");
        requestDispatcher.forward(req,resp);
    }
}
- Ŕ«┐ÚŚ«view1.htmlšÜäurlńŞ� : http://localhost:8080/web03_war_exploded/view1Servlet
- ňŻôňëŹŔÁäŠ║ÉńŞ� : view1Servlet
- ňŻôňëŹŔÁäŠ║ÉšÜäŠëÇňťĘŔĚ»ňżäńŞ║ : http://localhost:8080/web03_war_exploded/
- ŔŽüŔÄĚňĆľšÜ䚍«ŠáçŔÁäŠ║ÉurlńŞ� : http://localhost:8080/web03_war_exploded/static/img/logo.png
- view1.htmlńŞşň«Üń╣ëšÜäń║� :
<img src="static/img/logo.png"/> - ň»╗ŠëżŠľ╣ň╝Ćň░▒Šś»ňťĘňŻôňëŹŔÁäŠ║ÉŠëÇňťĘŔĚ»ňż�(http://localhost:8080/web03_war_exploded/)ňÉÄŠő╝ŠÄąsrcň▒׊ǞňÇ�(static/img/logo.png),ŠşúňąŻŠś»šŤ«ŠáçŔÁäŠ║ÉŠşúňŞŞŔÄĚňĆľšÜäurl(http://localhost:8080/web03_war_exploded/static/img/logo.png)
<!DOCTYPE html>
<html lang="en">
<head>
    <meta charset="UTF-8">
    <title>Title</title>
</head>
<body>

<img src="static/img/logo.png">
</body>
</html>
10.2.1.2 š╗Łň»╣ŔĚ»ňżäŠâůňćÁňłćŠ×É
š╗Łň»╣ŔĚ»ňżäŠâůňćÁ1:web/index.htmlńŞşň╝Ľňůąweb/static/img/logo.png
- Ŕ«┐ÚŚ«index.htmlšÜäurlńŞ� : http://localhost:8080/web03_war_exploded/index.html
- š╗Łň»╣ŔĚ»ňżäšÜäňč║ňçćŔĚ»ňżäńŞ║ : http://localhost:8080
- ŔŽüŔÄĚňĆľšÜ䚍«ŠáçŔÁäŠ║ÉurlńŞ� : http://localhost:8080/web03_war_exploded/static/img/logo.png
- index.htmlńŞşň«Üń╣ëšÜäń║� :
<img src="/web03_war_exploded/static/img/logo.png"/> - ň»╗ŠëżŠľ╣ň╝Ćň░▒Šś»ňťĘňč║ňçćŔĚ»ňż�(http://localhost:8080)ňÉÄÚŁóŠő╝ŠÄąsrcň▒׊ǞňÇ�(/web03_war_exploded/static/img/logo.png),ňżŚňł░šÜ䊺úŠś»šŤ«ŠáçŔÁäŠ║ÉŔ«┐ÚŚ«šÜ䊺úší«ŔĚ»ňżä
<!DOCTYPE html>
<html lang="en">
<head>
<meta charset="UTF-8">
<title>Title</title>
</head>
<body>
<!-- š╗Łň»╣ŔĚ»ňżäňćÖŠ│Ľ -->
<img src="/web03_war_exploded/static/img/logo.png">
</body>
</html>
š╗Łň»╣ŔĚ»ňżäŠâůňćÁ2:web/a/b/c/test.htmlńŞşň╝Ľňůąweb/static/img/logo.png
- Ŕ«┐ÚŚ«test.htmlšÜäurlńŞ� : http://localhost:8080/web03_war_exploded/a/b/c/test.html
- š╗Łň»╣ŔĚ»ňżäšÜäňč║ňçćŔĚ»ňżäńŞ║ : http://localhost:8080
- ŔŽüŔÄĚňĆľšÜ䚍«ŠáçŔÁäŠ║ÉurlńŞ� : http://localhost:8080/web03_war_exploded/static/img/logo.png
- test.htmlńŞşň«Üń╣ëšÜäń║� :
<img src="/web03_war_exploded/static/img/logo.png"/> - ň»╗ŠëżŠľ╣ň╝Ćň░▒Šś»ňťĘňč║ňçćŔĚ»ňż�(http://localhost:8080)ňÉÄÚŁóŠő╝ŠÄąsrcň▒׊ǞňÇ�(/web03_war_exploded/static/img/logo.png),ňżŚňł░šÜ䊺úŠś»šŤ«ŠáçŔÁäŠ║ÉŔ«┐ÚŚ«šÜ䊺úší«ŔĚ»ňżä
<!DOCTYPE html>
<html lang="en">
<head>
<meta charset="UTF-8">
<title>Title</title>
</head>
<body>
<!-- š╗Łň»╣ŔĚ»ňżäňćÖŠ│Ľ -->
<img src="/web03_war_exploded/static/img/logo.png">
</body>
</html>
š╗Łň»╣ŔĚ»ňżäŠâůňćÁ3:web/WEB-INF/views/view1.htmlńŞşň╝Ľňůąweb/static/img/logo.png
- view1.htmlňťĘWEB-INFńŞ�,ÚťÇŔŽüÚÇÜŔ┐çServletŔ»ĚŠ▒éŔŻČňĆĹŔÄĚňżŚ
@WebServlet("/view1Servlet")
public class View1Servlet extends HttpServlet {
    @Override
    protected void service(HttpServletRequest req, HttpServletResponse resp) throws ServletException, IOException {
        RequestDispatcher requestDispatcher = req.getRequestDispatcher("WEB-INF/views/view1.html");
        requestDispatcher.forward(req,resp);
    }
}
- Ŕ«┐ÚŚ«view1.htmlšÜäurlńŞ� : http://localhost:8080/web03_war_exploded/view1Servlet
- š╗Łň»╣ŔĚ»ňżäšÜäňč║ňçćŔĚ»ňżäńŞ║ : http://localhost:8080
- ŔŽüŔÄĚňĆľšÜ䚍«ŠáçŔÁäŠ║ÉurlńŞ� : http://localhost:8080/web03_war_exploded/static/img/logo.png
- view1.htmlńŞşň«Üń╣ëšÜäń║� :
<img src="/web03_war_exploded/static/img/logo.png"/> - ň»╗ŠëżŠľ╣ň╝Ćň░▒Šś»ňťĘňč║ňçćŔĚ»ňż�(http://localhost:8080)ňÉÄÚŁóŠő╝ŠÄąsrcň▒׊ǞňÇ�(/static/img/logo.png),ňżŚňł░šÜ䊺úŠś»šŤ«ŠáçŔÁäŠ║ÉŔ«┐ÚŚ«šÜ䊺úší«ŔĚ»ňżä
<!DOCTYPE html>
<html lang="en">
<head>
    <meta charset="UTF-8">
    <title>Title</title>
</head>
<body>

<img src="/web03_war_exploded/static/img/logo.png">
</body>
</html>
10.2.1.3 baseŠáçšşżšÜäńŻ┐šö�
baseŠáçšşżň«Üń╣ëÚíÁڣ󚍪ň»╣ŔĚ»ňżäňůČňů▒ň돚╝Ç
- base Šáçšşżň«Üń╣ëňťĘheadŠáçšşżńŞ�,šöĘń║Äň«Üń╣뚍Şň»╣ŔĚ»ňżäšÜäňůČňů▒ň돚╝Ç
- base Šáçšşżň«Üń╣ëšÜäňůČňů▒ň돚╝ÇňƬňťĘšŤŞň»╣ŔĚ»ňżäńŞŐŠťëŠĽ�,š╗Łň»╣ŔĚ»ňżäńŞşŠŚáŠĽ�
- ňŽéŠ×ťšŤŞň»╣ŔĚ»ňżäň╝ÇňĄ┤Šťë ./ ŠłľŔÇ�../ń┐«Úą░,ňłÖbaseŠáçšşżň»╣Ŕ»ąŔĚ»ňżäňÉîŠáĚŠŚáŠĽł
index.html ňĺîa/b/c/test.html ń╗ąňĆŐview1Servlet ńŞşšÜäŔĚ»ňżäňĄäšÉć
<!DOCTYPE html>
<html lang="en">
<head>
<meta charset="UTF-8">
<title>Title</title>
<!--ň«Üń╣뚍Şň»╣ŔĚ»ňżäšÜäňůČňů▒ň돚╝Ç,ň░暍Şň»╣ŔĚ»ňżäŔŻČňłÉń║ćš╗Łň»╣ŔĚ»ňż�-->
<base href="/web03_war_exploded/">
</head>
<body>
<img src="static/img/logo.png">
</body>
</html>
10.2.1.4 š╝║šťüÚí╣šŤ«ńŞŐńŞőŠľçŔĚ»ňż�
Úí╣šŤ«ńŞŐńŞőŠľçŔĚ»ňżäňĆśňîľÚŚ«Úó�
- ÚÇÜŔ┐ç baseŠáçšşżŔÖŻšäÂŔžúňć│ń║暍Şň»╣ŔĚ»ňżäŔŻČš╗Łň»╣ŔĚ»ňżäÚŚ«Úóś,ńŻćŠś»baseńŞşň«Üń╣ëšÜ䊜»Úí╣šŤ«šÜäńŞŐńŞőŠľçŔĚ»ňż�
- Úí╣šŤ«šÜäńŞŐńŞőŠľçŔĚ»ňżäŠś»ňĆ»ń╗ąÚÜĆŠäĆňĆśňîľšÜä
- ńŞÇŠŚŽÚí╣šŤ«šÜäńŞŐńŞőŠľçŔĚ»ňżäňĆĹšöčňĆśňî�,ŠëÇŠťëbaseŠáçšşżńŞşšÜäŔĚ»ňżäÚâŻÚťÇŔŽüŠö╣
Ŕžúňć│Šľ╣Šíł
- ň░ćÚí╣šŤ«šÜäńŞŐńŞőŠľçŔĚ»ňżäŔ┐ŤŔíîš╝║šťüŔ«żšŻ�,Ŕ«żšŻ«ńŞ� /,ŠëÇŠťëšÜäš╗Łň»╣ŔĚ»ňżäńŞşň░▒ńŞŹň┐ůňíźňćÖÚí╣šŤ«šÜäńŞŐńŞőŠľçń║�,šŤ┤ŠÄąň░▒Šś»/ň╝ÇňĄ┤ňŹ│ňĆ�
10.2.2 ÚçŹň«ÜňÉĹńŞşšÜäŔĚ»ňżäÚŚ«Úó�
šŤ«Šáç :šö�/x/y/z/servletAÚçŹň«ÜňÉĹňł░a/b/c/test.html
@WebServlet("/x/y/z/servletA")
public class ServletA extends HttpServlet {
    @Override
    protected void service(HttpServletRequest req, HttpServletResponse resp) throws ServletException, IOException {

    }
}
10.2.2.1šŤŞň»╣ŔĚ»ňżäňćÖŠ│Ľ
- Ŕ«┐ÚŚ«ServletAšÜäurlńŞ� : http://localhost:8080/web03_war_exploded/x/y/z/servletA
- ňŻôňëŹŔÁäŠ║ÉńŞ� : servletA
- ňŻôňëŹŔÁäŠ║ÉšÜäŠëÇňťĘŔĚ»ňżäńŞ║ : http://localhost:8080/web03_war_exploded/x/x/z/
- ŔŽüŔÄĚňĆľšÜ䚍«ŠáçŔÁäŠ║ÉurlńŞ� : http://localhost:8080/web03_war_exploded/a/b/c/test.html
- ServletAÚçŹň«ÜňÉĹšÜäŔĚ»ňżä : ../../../a/b/c/test/html
- ň»╗ŠëżŠľ╣ň╝Ćň░▒Šś»ňťĘňŻôňëŹŔÁäŠ║ÉŠëÇňťĘŔĚ»ňż�(http://localhost:8080/web03_war_exploded/x/y/z/)ňÉÄŠő╝ŠÄ�(../../../a/b/c/test/html),ňŻóŠłÉ(http://localhost:8080/web03_war_exploded/x/y/z/../../../a/b/c/test/html)Š»Ćńެ../ŠŐÁŠÂłńŞÇň▒隍«ňŻ�,ŠşúňąŻŠś»šŤ«ŠáçŔÁäŠ║ÉŠşúňŞŞŔÄĚňĆľšÜäurl(http://localhost:8080/web03_war_exploded/a/b/c/test/html)
@WebServlet("/x/y/z/servletA")
public class ServletA extends HttpServlet {
@Override
protected void service(HttpServletRequest req, HttpServletResponse resp) throws ServletException, IOException {
// šŤŞň»╣ŔĚ»ňżäÚçŹň«ÜňÉĹňł░test.html
resp.sendRedirect("../../../a/b/c/test.html");
}
}
10.2.2.2š╗Łň»╣ŔĚ»ňżäňćÖŠ│Ľ
-
Ŕ«┐ÚŚ«ServletAšÜäurlńŞ� : http://localhost:8080/web03_war_exploded/x/y/z/servletA
-
š╗Łň»╣ŔĚ»ňżäšÜäňč║ňçćŔĚ»ňżäńŞ║ : http://localhost:8080
-
ŔŽüŔÄĚňĆľšÜ䚍«ŠáçŔÁäŠ║ÉurlńŞ� : http://localhost:8080/web03_war_exploded/a/b/c/test.html
-
ServletAÚçŹň«ÜňÉĹšÜäŔĚ»ňżä : /web03_war_exploded/a/b/c/test.html
-
ň»╗ŠëżŠľ╣ň╝Ćň░▒Šś»ňťĘňč║ňçćŔĚ»ňż�(http://localhost:8080)ňÉÄÚŁóŠő╝ŠÄą(/web03_war_exploded/a/b/c/test.html),ňżŚňł░( http://localhost:8080/web03_war_exploded/a/b/c/test.html)ŠşúŠś»šŤ«ŠáçŔÁäŠ║ÉŔ«┐ÚŚ«šÜ䊺úší«ŔĚ»ňż�
-
š╗Łň»╣ŔĚ»ňżäńŞşÚťÇŔŽüňíźňćÖÚí╣šŤ«ńŞŐńŞőŠľçŔĚ»ňżä,ńŻćŠś»ńŞŐńŞőŠľçŔĚ»ňżäŠś»ňĆśŠŹóšÜ�
- ňĆ»ń╗ąÚÇÜŔ┐ç ServletContextšÜägetContextPath()ŔÄĚňĆľńŞŐńŞőŠľçŔĚ»ňż�
- ňĆ»ń╗ąň░ćÚí╣šŤ«ńŞŐńŞőŠľçŔĚ»ňżäň«Üń╣ëńŞ� / š╝║šťüŔĚ»ňżä,Úéúń╣łŔĚ»ňżäńŞşšŤ┤ŠÄąń╗ą/ň╝ÇňĄ┤ňŹ│ňĆ�
java //š╗Łň»╣ŔĚ»ňżäńŞ�,ŔŽüňćÖÚí╣šŤ«ńŞŐńŞőŠľçŔĚ»ňż� //resp.sendRedirect("/web03_war_exploded/a/b/c/test.html"); // ÚÇÜŔ┐çServletContextň»╣Ŕ▒íňŐĘŠÇüŔÄĚňĆľÚí╣šŤ«ńŞŐńŞőŠľçŔĚ»ňżä //resp.sendRedirect(getServletContext().getContextPath()+"/a/b/c/test.html"); // š╝║šťüÚí╣šŤ«ńŞŐńŞőŠľçŔĚ»ňżäŠŚÂ,šŤ┤ŠÄąń╗�/ň╝ÇňĄ┤ňŹ│ňĆ� resp.sendRedirect("/a/b/c/test.html");
10.2.3 Ŕ»ĚŠ▒éŔŻČňĆĹńŞşšÜäŔĚ»ňżäÚŚ«Úóś
šŤ«Šáç :šö▒x/y/servletBŔ»ĚŠ▒éŔŻČňĆĹňł░a/b/c/test.html
@WebServlet("/x/y/servletB")
public class ServletB extends HttpServlet {
    @Override
    protected void service(HttpServletRequest req, HttpServletResponse resp) throws ServletException, IOException {

    }
}
10.2.3.1 šŤŞň»╣ŔĚ»ňżäňćÖŠ│Ľ
-
Ŕ«┐ÚŚ«ServletBšÜäurlńŞ� : http://localhost:8080/web03_war_exploded/x/y/servletB
-
ňŻôňëŹŔÁäŠ║ÉńŞ� : servletB
-
ňŻôňëŹŔÁäŠ║ÉšÜäŠëÇňťĘŔĚ»ňżäńŞ║ : http://localhost:8080/web03_war_exploded/x/x/
-
ŔŽüŔÄĚňĆľšÜ䚍«ŠáçŔÁäŠ║ÉurlńŞ� : http://localhost:8080/web03_war_exploded/a/b/c/test.html
-
ServletAŔ»ĚŠ▒éŔŻČňĆĹŔĚ»ňżä : ../../a/b/c/test/html
-
ň»╗ŠëżŠľ╣ň╝Ćň░▒Šś»ňťĘňŻôňëŹŔÁäŠ║ÉŠëÇňťĘŔĚ»ňż�(http://localhost:8080/web03_war_exploded/x/y/)ňÉÄŠő╝ŠÄ�(../../a/b/c/test/html),ňŻóŠłÉ(http://localhost:8080/web03_war_exploded/x/y/../../a/b/c/test/html)Š»Ćńެ../ŠŐÁŠÂłńŞÇň▒隍«ňŻ�,ŠşúňąŻŠś»šŤ«ŠáçŔÁäŠ║ÉŠşúňŞŞŔÄĚňĆľšÜäurl(http://localhost:8080/web03_war_exploded/a/b/c/test/html)
``` java @WebServlet("/x/y/servletB") public class ServletB extends HttpServlet { @Override protected void service(HttpServletRequest req, HttpServletResponse resp) throws ServletException, IOException { RequestDispatcher requestDispatcher = req.getRequestDispatcher("../../a/b/c/test.html"); requestDispatcher.forward(req,resp); } }
```
10.2.3.2š╗Łň»╣ŔĚ»ňżäňćÖŠ│Ľ
-
Ŕ»ĚŠ▒éŔŻČňĆĹňƬŔâŻŔŻČňĆĹňł░Úí╣šŤ«ňćůÚâĘšÜäŔÁäŠ║É,ňůš╗Łň»╣ŔĚ»ňżäŠŚáڝNJĚ╗ňŐáÚí╣šŤ«ńŞŐńŞőŠľçŔĚ»ňż�
-
Ŕ»ĚŠ▒éŔŻČňĆĹš╗Łň»╣ŔĚ»ňżäšÜäňč║ňçćŔĚ»ňżäšŤŞňŻôń║Ähttp://localhost:8080/web03_war_exploded
-
ňťĘÚí╣šŤ«ńŞŐńŞőŠľçŔĚ»ňżäńŞ║š╝║šťüňÇ╝ŠŚÂ,ń╣芌áڝNJö╣ňĆś,šŤ┤ŠÄąń╗�/ň╝ÇňĄ┤ňŹ│ňĆ�
java
@WebServlet("/x/y/servletB")
public class ServletB extends HttpServlet {
    @Override
    protected void service(HttpServletRequest req, HttpServletResponse resp) throws ServletException, IOException {
        RequestDispatcher requestDispatcher = req.getRequestDispatcher("/a/b/c/test.html");
        requestDispatcher.forward(req,resp);
    }
}
10.2.3.3šŤ«ŠáçŔÁäŠ║ÉňćůšŤŞň»╣ŔĚ»ňżäňĄäšÉ�
-
ŠşĄŠŚÂÚťÇŔŽüŠ│ĘŠä�,Ŕ»ĚŠ▒éŔŻČňĆĹŠś»ŠťŹňŐíňÖĘŔíîńŞ║,ŠÁĆŔžłňÖĘńŞŹščąÚüô,ňť░ňŁÇŠáĆńŞŹňĆśňîľ,šŤŞňŻôń║ÄŠłĹń╗ČŔ«┐ÚŚ«test.htmlšÜäŔĚ»ňżäńŞ║http://localhost:8080/web03_war_exploded/x/y/servletB
-
Úéúń╣łŠşĄŠŚÂ test.htmlŔÁäŠ║ÉšÜäŠëÇňťĘŔĚ»ňżäň░▒Šś»http://localhost:8080/web03_war_exploded/x/y/ŠëÇń╗ątest.htmlńŞşšŤŞň»╣ŔĚ»ňżäŔŽüňč║ń║ÄŔ»ąŔĚ»ňżäš╝ľňć�,ňŽéŠ×ťńŻ┐šöĘš╗Łň»╣ŔĚ»ňżäňłÖńŞŹšöĘŔÇâŔÖĹ
html <!DOCTYPE html> <html lang="en"> <head> <meta charset="UTF-8"> <title>Title</title> </head> <body> <!-- ňŻôňëŹŔÁäŠ║ÉŔĚ»ňżäŠś� http://localhost:8080/web03_war_exploded/x/y/servletB ňŻôňëŹŔÁäŠ║ÉŠëÇňťĘŔĚ»ňżäŠś» http://localhost:8080/web03_war_exploded/x/y/ šŤ«ŠáçŔÁäŠ║ÉŔĚ»ňżä=ŠëÇňťĘŔÁäŠ║ÉŔĚ»ňż�+srcň▒׊ǞňÇ� http://localhost:8080/web03_war_exploded/x/y/../../static/img/logo.png http://localhost:8080/web03_war_exploded/static/img/logo.png ňżŚňł░šŤ«ŠáçŔĚ»ňżäŠşúŠś»šŤ«ŠáçŔÁäŠ║ÉšÜäŔ«┐ÚŚ«ŔĚ»ňż� --> <img src="../../static/img/logo.png"> </body> </html>
ňŹüńŞÇ MVCŠ×Š×äŠĘíň╝Ć
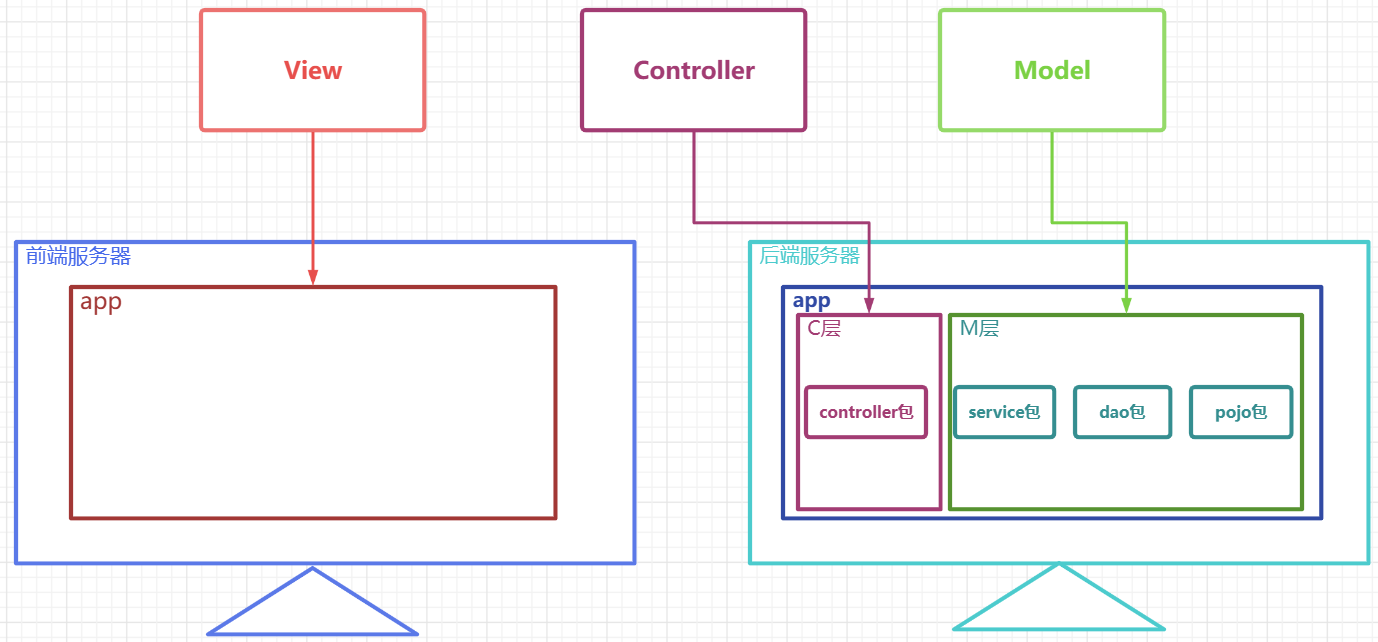
MVC´╝łModel View Controller´╝늜»ŔŻ»ń╗ÂňĚąšĘőńŞşšÜäńŞÇšž�
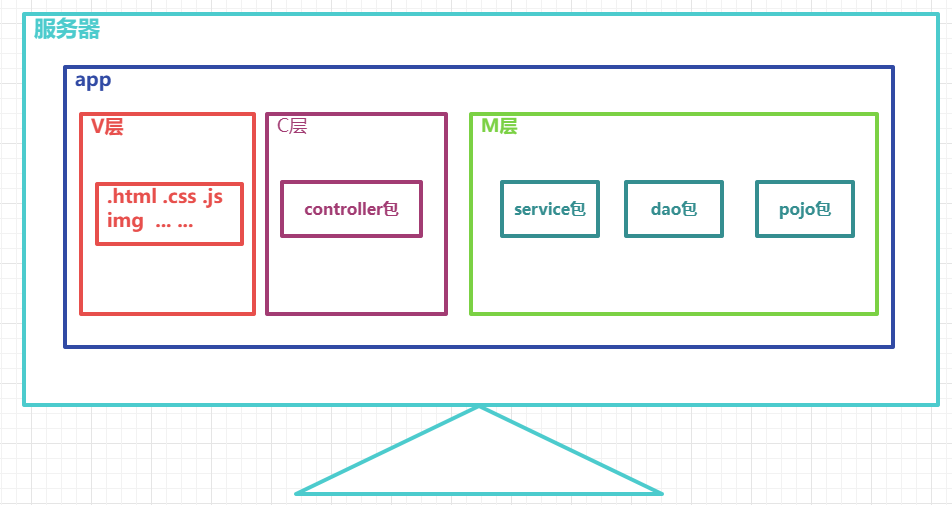
ŔŻ»ń╗Š×Š×äŠĘíň╝Ć´╝îň«âŠŐŐŔŻ»ń╗š│╗š╗čňłćńŞ�ŠĘíň×őŃÇ�ŔžćňŤżňĺ�ŠÄžňłÂňÖ�ńŞëńެňč║ŠťČÚâĘňłćŃÇéšöĘńŞÇšžŹńŞÜňŐíÚÇ╗ŔżĹŃÇüŠĽ░ŠŹ«ŃÇüšĽîÚŁóŠśżšĄ║ňłćšŽ╗šÜ䊾╣Š│Ľš╗äš╗çń╗úšáü´╝îň░ćńŞÜňŐíÚÇ╗ŔżĹŔüÜÚŤćňł░ńŞÇńެÚâĘń╗ÂÚçîÚŁó´╝îňťĘŠö╣Ŕ┐ŤňĺîńެŠÇžňîľň«ÜňłÂšĽîÚŁóňĆŐšöĘŠłĚń║Ąń║ĺšÜäňÉ´╝îńŞŹÚťÇŔŽüÚ珊ľ░š╝ľňćÖńŞÜňŐíÚÇ╗ŔżĹŃÇ�
-
M´╝ÜModel ŠĘíň×őň▒�,ňůĚńŻôňŐčŔâŻňŽéńŞő
- ňşśŠöżňĺ░ŠŹ«ň║ôň»╣Ŕ▒íšÜäň«×ńŻôš▒╗ń╗ąňĆŐńŞÇń║ŤšöĘń║ÄňşśňéĘڣ׊Ľ░ŠŹ«ň║ôŔíĘň«îŠĽ┤šŤŞňů│šÜäVOň»╣Ŕ▒í
- ňşśŠöżńŞÇń║Ťň»╣ŠĽ░ŠŹ«Ŕ┐ŤŔíîÚÇ╗ŔżĹŔ┐Éš«ŚŠôŹńŻťšÜäšÜäńŞÇń║ŤńŞÜňŐíňĄäšÉćń╗úšá�
-
V´╝ÜView ŔžćňŤżň▒�,ňůĚńŻôňŐčŔâŻňŽéńŞő
- ňşśŠöżńŞÇń║ŤŔžćňŤżŠľçń╗šŤŞňů│šÜäń╗úšáü html css jsšş�
- ňťĘňëŹňÉÄšź»ňłćšŽ╗šÜäÚí╣šŤ«ńŞş,ňÉÄšź»ňĚ▓š╗ĆŠ▓튝ëŔžćňŤżŠľçń╗Â,Ŕ»ąň▒éŠČíňĚ▓š╗ĆŔíŹňłÉšőČšźőšÜäň돚ź»Úí╣šŤ�
-
C´╝ÜController ŠÄžňłÂň▒�,ňůĚńŻôňŐčŔâŻňŽéńŞő
- ŠÄąŠöÂň«óŠłĚšź»Ŕ»ĚŠ▒�,ŔÄĚňżŚŔ»ĚŠ▒銼░ŠŹ«
- ň░ćňçćňĄçňąŻšÜ䊼░ŠŹ«ňôŹň║öš╗Öň«óŠłĚšź�
MVCŠĘíň╝ĆńŞ�,Úí╣šŤ«ńŞşšÜäňŞŞŔžüňî�
-
M:
- ň«×ńŻôš▒╗ňîů(pojo /entity /bean) ńŞôÚŚĘňşśŠöżňĺ░ŠŹ«ň║ôň»╣ň║öšÜäň«×ńŻôš▒╗ňĺîńŞÇń║ŤVOň»╣Ŕ▒í
- ŠĽ░ŠŹ«ň║ôŔ«┐ÚŚ«ňîů(dao/mapper) ńŞôÚŚĘňşśŠöżň»╣ŠĽ░ŠŹ«ň║ôńŞŹňÉîŔíĘŠá╝CURDŠľ╣Š│Ľň░üŔúůšÜäńŞÇń║Ťš▒╗
- ŠťŹňŐíňî�(service) ńŞôÚŚĘňşśŠöżň»╣ŠĽ░ŠŹ«Ŕ┐ŤŔíîńŞÜňŐíÚÇ╗ŔżĹŔ┐Éš«ŚšÜäńŞÇń║Ťš▒╗
-
C:
- ŠÄžňłÂň▒éňîů(controller)
-
V:
- webšŤ«ňŻĽńŞőšÜäŔžćňŤżŔÁäŠ║É html css js img šş�
- ň돚ź»ňĚąšĘőňîľňÉÄ,ňťĘňÉÄšź»Úí╣šŤ«ńŞşňĚ▓š╗ĆńŞŹňşśňťĘń║ć
ÚŁ×ňëŹňÉÄšź»ňłćšŽ╗šÜäMVC
ňëŹňÉÄšź»ňłćšŽ╗šÜäMVC
ňŹüń║î Šíłńżőň╝ÇňĆ�-ŠŚąšĘőš«íšÉć-šČČń║�
12.1 Úí╣šŤ«ŠÉşň╗║
12.1.1 ŠĽ░ŠŹ«ň║ôňçćňĄ�
- ňłŤň╗║schedule_systemŠĽ░ŠŹ«ň║ôň╣ŠëžŔíîňŽéńŞőŔ»şňĆą
SET NAMES utf8mb4;
SET FOREIGN_KEY_CHECKS = 0;
-- ----------------------------
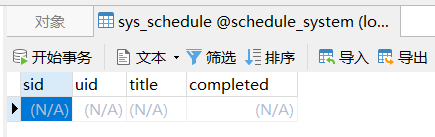
-- ňłŤň╗║ŠŚąšĘőŔí�
-- ----------------------------
DROP TABLE IF EXISTS `sys_schedule`;
CREATE TABLE `sys_schedule` (
`sid` int NOT NULL AUTO_INCREMENT,
`uid` int NULL DEFAULT NULL,
`title` varchar(20) CHARACTER SET utf8mb4 COLLATE utf8mb4_0900_ai_ci NULL DEFAULT NULL,
`completed` int(1) NULL DEFAULT NULL,
PRIMARY KEY (`sid`) USING BTREE
) ENGINE = InnoDB AUTO_INCREMENT = 1 CHARACTER SET = utf8mb4 COLLATE = utf8mb4_0900_ai_ci ROW_FORMAT = Dynamic;
-- ----------------------------
-- ŠĆĺňůąŠŚąšĘőŠĽ░ŠŹ«
-- ----------------------------
-- ----------------------------
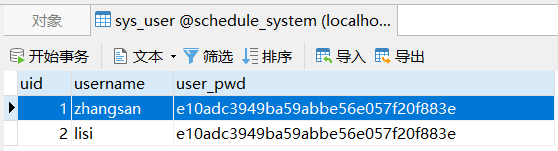
-- ňłŤň╗║šöĘŠłĚŔí�
-- ----------------------------
DROP TABLE IF EXISTS `sys_user`;
CREATE TABLE `sys_user` (
`uid` int NOT NULL AUTO_INCREMENT,
`username` varchar(10) CHARACTER SET utf8mb4 COLLATE utf8mb4_0900_ai_ci NULL DEFAULT NULL,
`user_pwd` varchar(100) CHARACTER SET utf8mb4 COLLATE utf8mb4_0900_ai_ci NULL DEFAULT NULL,
PRIMARY KEY (`uid`) USING BTREE,
UNIQUE INDEX `username`(`username`) USING BTREE
) ENGINE = InnoDB CHARACTER SET = utf8mb4 COLLATE = utf8mb4_0900_ai_ci ROW_FORMAT = Dynamic;
-- ----------------------------
-- ŠĆĺňůąšöĘŠłĚŠĽ░ŠŹ«
-- ----------------------------
INSERT INTO `sys_user` VALUES (1, 'zhangsan', 'e10adc3949ba59abbe56e057f20f883e');
INSERT INTO `sys_user` VALUES (2, 'lisi', 'e10adc3949ba59abbe56e057f20f883e');
SET FOREIGN_KEY_CHECKS = 1;
- ŔÄĚňżŚňŽéńŞőŔíĘŠá╝
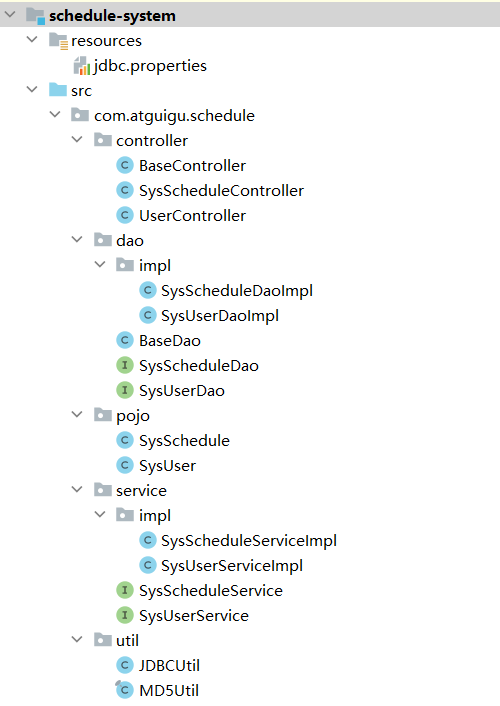
12.1.2 Úí╣šŤ«š╗ôŠ×ä
12.1.3 ň»╝ňůąńżŁŔÁľ
12.1.4 pojoňîůňĄäšÉ�
ńŻ┐šöĘlombokňĄäšÉćgetter setter equals hashcode Š×äÚÇáňÖĘ
//-----------------------------------------------------
package com.atguigu.schedule.pojo;

import lombok.AllArgsConstructor;
import lombok.Data;
import lombok.NoArgsConstructor;
import java.io.Serializable;
@AllArgsConstructor
@NoArgsConstructor
@Data
public class SysUser  implements Serializable {
    private Integer uid;
    private String username;
    private String userPwd;
}
//------------------------------------------------------
package com.atguigu.schedule.pojo;

import lombok.AllArgsConstructor;
import lombok.Data;
import lombok.NoArgsConstructor;
import java.io.Serializable;

@AllArgsConstructor
@NoArgsConstructor
@Data
public class SysSchedule implements Serializable {
    private Integer sid;
    private Integer uid;
    private String title;
    private Integer completed;
}
//------------------------------------------------------
12.1.5 daoňîůňĄäšÉ�
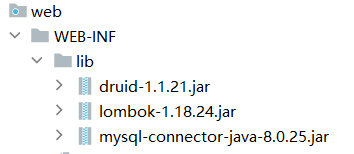
ň»╝ňůąJDBCUtilŔ┐׊ĹŠ▒áňĚąňůĚš▒╗ň╣ÂňçćňĄçjdbc.propertiesÚůŹšŻ«Šľçń╗Â
package com.atguigu.schedule.util;
import com.alibaba.druid.pool.DruidDataSourceFactory;
import javax.sql.DataSource;
import java.io.IOException;
import java.io.InputStream;
import java.sql.Connection;
import java.sql.SQLException;
import java.util.Properties;
public class JDBCUtil {
private static ThreadLocal<Connection> threadLocal =new ThreadLocal<>();
private static DataSource dataSource;
// ňłŁňžőňîľŔ┐׊ĹŠ▒á
static{
// ňĆ»ń╗ąňŞ«ňŐꊳĹń╗ČŔ»╗ňĆľ.propertiesÚůŹšŻ«Šľçń╗Â
Properties properties =new Properties();
InputStream resourceAsStream = JDBCUtil.class.getClassLoader().getResourceAsStream("jdbc.properties");
try {
properties.load(resourceAsStream);
} catch (IOException e) {
throw new RuntimeException(e);
}
try {
dataSource = DruidDataSourceFactory.createDataSource(properties);
} catch (Exception e) {
throw new RuntimeException(e);
}
}
/*1 ňÉĹňĄľŠĆÉńżŤŔ┐׊ĹŠ▒ášÜ䊾╣Š│Ľ*/
public static DataSource getDataSource(){
return dataSource;
}
/*2 ňÉĹňĄľŠĆÉńżŤŔ┐׊ĹšÜ䊾╣Š│�*/
public static Connection getConnection(){
Connection connection = threadLocal.get();
if (null == connection) {
try {
connection = dataSource.getConnection();
} catch (SQLException e) {
throw new RuntimeException(e);
}
threadLocal.set(connection);
}
return connection;
}
/*ň«Üń╣ëńŞÇńެňŻĺŔ┐śŔ┐׊ĹšÜ䊾╣Š│Ľ (ŔžúÚÖĄňĺîThreadLocalń╣őÚŚ┤šÜäňů│Ŕüöňů│š│�) */
public static void releaseConnection(){
Connection connection = threadLocal.get();
if (null != connection) {
threadLocal.remove();
// ŠŐŐŔ┐׊ĹŔ«żšŻ«ňŤ×Ŕç¬ňŐĘŠĆÉń║ĄšÜäŔ┐׊Ä�
try {
connection.setAutoCommit(true);
// Ŕç¬ňŐĘňŻĺŔ┐śňł░Ŕ┐׊ĹŠ▒á
connection.close();
} catch (SQLException e) {
throw new RuntimeException(e);
}
}
}
}
driverClassName=com.mysql.cj.jdbc.Driver
url=jdbc:mysql://localhost:3306/schedule_system
username=root
password=root
initialSize=5
maxActive=10
maxWait=1000
- ňłŤň╗║BaseDaoň»╣Ŕ▒íň╣ÂňĄŹňłÂňŽéńŞőń╗úšá�
package com.atguigu.schedule.dao;
import com.atguigu.schedule.util.JDBCUtil;
import java.lang.reflect.Field;
import java.sql.*;
import java.time.LocalDateTime;
import java.util.ArrayList;
import java.util.List;
public class BaseDao {
// ňůČňů▒šÜäŠčąŔ»óŠľ╣Š│� Ŕ┐öňŤ×šÜ䊜»ňŹĽńެň»╣Ŕ▒í
public <T> T baseQueryObject(Class<T> clazz, String sql, Object ... args) {
T t = null;
Connection connection = JDBCUtil.getConnection();
PreparedStatement preparedStatement = null;
ResultSet resultSet = null;
int rows = 0;
try {
// ňçćňĄçŔ»şňĆąň»╣Ŕ▒í
preparedStatement = connection.prepareStatement(sql);
// Ŕ«żšŻ«Ŕ»şňĆąńŞŐšÜäňĆ銼░
for (int i = 0; i < args.length; i++) {
preparedStatement.setObject(i + 1, args[i]);
}
// ŠëžŔíî ŠčąŔ»ó
resultSet = preparedStatement.executeQuery();
if (resultSet.next()) {
t = (T) resultSet.getObject(1);
}
} catch (Exception e) {
e.printStackTrace();
} finally {
if (null != resultSet) {
try {
resultSet.close();
} catch (SQLException e) {
e.printStackTrace();
}
}
if (null != preparedStatement) {
try {
preparedStatement.close();
} catch (SQLException e) {
e.printStackTrace();
}
}
JDBCUtil.releaseConnection();
}
return t;
}
// ňůČňů▒šÜäŠčąŔ»óŠľ╣Š│� Ŕ┐öňŤ×šÜ䊜»ň»╣Ŕ▒íšÜäÚŤćňÉ�
public <T> List<T> baseQuery(Class clazz, String sql, Object ... args){
List<T> list =new ArrayList<>();
Connection connection = JDBCUtil.getConnection();
PreparedStatement preparedStatement=null;
ResultSet resultSet =null;
int rows = 0;
try {
// ňçćňĄçŔ»şňĆąň»╣Ŕ▒í
preparedStatement = connection.prepareStatement(sql);
// Ŕ«żšŻ«Ŕ»şňĆąńŞŐšÜäňĆ銼░
for (int i = 0; i < args.length; i++) {
preparedStatement.setObject(i+1,args[i]);
}
// ŠëžŔíî ŠčąŔ»ó
resultSet = preparedStatement.executeQuery();
ResultSetMetaData metaData = resultSet.getMetaData();
int columnCount = metaData.getColumnCount();
// ň░ćš╗ôŠ×ťÚŤćÚÇÜŔ┐çňĆŹň░äň░üŔúůŠłÉň«×ńŻôš▒╗ň»╣Ŕ▒í
while (resultSet.next()) {
// ńŻ┐šöĘňĆŹň░äň«×ńżőňîľň»╣Ŕ▒�
Object obj =clazz.getDeclaredConstructor().newInstance();
for (int i = 1; i <= columnCount; i++) {
String columnName = metaData.getColumnLabel(i);
Object value = resultSet.getObject(columnName);
// ňĄäšÉćdatetimeš▒╗ň×őňşŚŠ«Áňĺîjava.util.DataŔŻČŠŹóÚŚ«Úóś
if(value.getClass().equals(LocalDateTime.class)){
value= Timestamp.valueOf((LocalDateTime) value);
}
Field field = clazz.getDeclaredField(columnName);
field.setAccessible(true);
field.set(obj,value);
}
list.add((T)obj);
}
} catch (Exception e) {
e.printStackTrace();
} finally {
if (null !=resultSet) {
try {
resultSet.close();
} catch (SQLException e) {
throw new RuntimeException(e);
}
}
if (null != preparedStatement) {
try {
preparedStatement.close();
} catch (SQLException e) {
throw new RuntimeException(e);
}
}
JDBCUtil.releaseConnection();
}
return list;
}
// ÚÇÜšöĘšÜäňó×ňłáŠö╣Šľ╣Š│Ľ
public int baseUpdate(String sql,Object ... args) {
// ŔÄĚňĆľŔ┐׊Ĺ
Connection connection = JDBCUtil.getConnection();
PreparedStatement preparedStatement=null;
int rows = 0;
try {
// ňçćňĄçŔ»şňĆąň»╣Ŕ▒í
preparedStatement = connection.prepareStatement(sql);
// Ŕ«żšŻ«Ŕ»şňĆąńŞŐšÜäňĆ銼░
for (int i = 0; i < args.length; i++) {
preparedStatement.setObject(i+1,args[i]);
}
// ŠëžŔíî ňó×ňłáŠö� executeUpdate
rows = preparedStatement.executeUpdate();
// ÚçŐŠöżŔÁäŠ║É(ňĆ»ÚÇ�)
} catch (SQLException e) {
e.printStackTrace();
} finally {
if (null != preparedStatement) {
try {
preparedStatement.close();
} catch (SQLException e) {
throw new RuntimeException(e);
}
}
JDBCUtil.releaseConnection();
}
// Ŕ┐öňŤ×šÜ䊜»ňŻ▒ňôŹŠĽ░ŠŹ«ň║ôŔ«░ňŻĽŠĽ░
return rows;
}
}
- daoň▒éŠëÇŠťëŠÄąňĆ�
//---------------------------------------------------
package com.atguigu.schedule.dao;
public interface SysUserDao {
}
//---------------------------------------------------
package com.atguigu.schedule.dao;
public interface SysScheduleDao {
}
//---------------------------------------------------
- daoň▒éŠëÇŠťëň«×šÄ░š▒╗
//------------------------------------------------------------------------------
package com.atguigu.schedule.dao.impl;
import com.atguigu.schedule.dao.BaseDao;
import com.atguigu.schedule.dao.SysUserDao;
public class SysUserDaoImpl extends BaseDao implements SysUserDao {
}

//------------------------------------------------------------------------------
package com.atguigu.schedule.dao.impl;
import com.atguigu.schedule.dao.BaseDao;
import com.atguigu.schedule.dao.SysScheduleDao;
public class SysScheduleDaoImpl extends BaseDao implements SysScheduleDao {
}
//------------------------------------------------------------------------------
12.1.6 serviceňîůňĄäšÉ�
- ŠÄąňĆú
//------------------------------------------------------------------------------
package com.atguigu.schedule.service;
public interface SysUserService {
}
//------------------------------------------------------------------------------
package com.atguigu.schedule.service;
public interface SysScheduleService {
}
//------------------------------------------------------------------------------
- ň«×šÄ░š▒�
//------------------------------------------------------------------------------
package com.atguigu.schedule.service.impl;
import com.atguigu.schedule.service.SysUserService;
public class SysUserServiceImpl implements SysUserService {
}
//------------------------------------------------------------------------------
package com.atguigu.schedule.service.impl;
import com.atguigu.schedule.service.SysScheduleService;
public class SysScheduleServiceImpl implements SysScheduleService {
}
//------------------------------------------------------------------------------
12.1.7 controllerňîůňĄäšÉ�
- BaseControllerňĄäšÉćŔ»ĚŠ▒éŔĚ»ňżäÚŚ«Úóś
package com.atguigu.schedule.controller;
import jakarta.servlet.ServletException;
import jakarta.servlet.http.HttpServlet;
import jakarta.servlet.http.HttpServletRequest;
import jakarta.servlet.http.HttpServletResponse;
import java.io.IOException;
import java.lang.reflect.Method;
public class BaseController extends HttpServlet {
@Override
protected void service(HttpServletRequest req, HttpServletResponse resp) throws ServletException, IOException {
String requestURI = req.getRequestURI();
String[] split = requestURI.split("/");
String methodName =split[split.length-1];
// ÚÇÜŔ┐çňĆŹň░äŔÄĚňĆľŔŽüŠëžŔíîšÜ䊾╣Š│Ľ
Class clazz = this.getClass();
try {
Method method=clazz.getDeclaredMethod(methodName,HttpServletRequest.class,HttpServletResponse.class);
// Ŕ«żšŻ«Šľ╣Š│ĽňĆ»ń╗ąŔ«┐ÚŚ«
method.setAccessible(true);
// ÚÇÜŔ┐çňĆŹň░äŠëžŔíîń╗úšáü
method.invoke(this,req,resp);
} catch (Exception e) {
e.printStackTrace();
}
}
}
- ňĄÜńެňĄäšÉćňÖĘš╗žŠë┐BaseController
//----------------------------------------------------------------------------
package com.atguigu.schedule.controller;

import jakarta.servlet.annotation.WebServlet;

@WebServlet("/user/*")
public class UserController extends BaseController{
}
//----------------------------------------------------------------------------
package com.atguigu.schedule.controller;

import jakarta.servlet.annotation.WebServlet;

@WebServlet("/schedule/*")
public class SysScheduleController  extends BaseController{
}
//----------------------------------------------------------------------------
12.1.8 ňŐáň»ćňĚąňůĚš▒╗šÜäńŻ┐šöĘ
- ň»╝ňůąMD5UtilňĚąňůĚš▒�
package com.atguigu.schedule.util;
import java.security.MessageDigest;
import java.security.NoSuchAlgorithmException;
public final class MD5Util {
public static String encrypt(String strSrc) {
try {
char hexChars[] = { '0', '1', '2', '3', '4', '5', '6', '7', '8',
'9', 'a', 'b', 'c', 'd', 'e', 'f' };
byte[] bytes = strSrc.getBytes();
MessageDigest md = MessageDigest.getInstance("MD5");
md.update(bytes);
bytes = md.digest();
int j = bytes.length;
char[] chars = new char[j * 2];
int k = 0;
for (int i = 0; i < bytes.length; i++) {
byte b = bytes[i];
chars[k++] = hexChars[b >>> 4 & 0xf];
chars[k++] = hexChars[b & 0xf];
}
return new String(chars);
} catch (NoSuchAlgorithmException e) {
e.printStackTrace();
throw new RuntimeException("MD5ňŐáň»ćňç║ÚöÖ!!!")
}
}
}
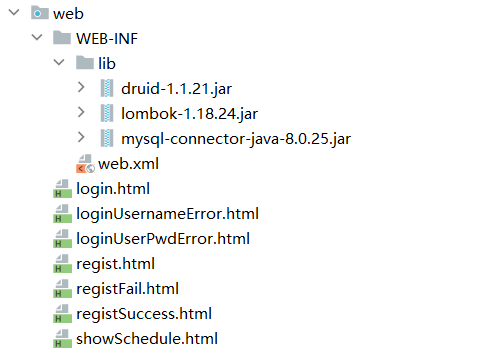
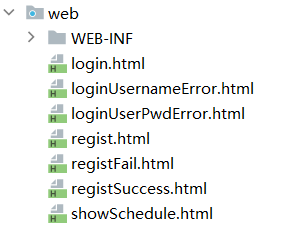
12.1.9 ÚíÁÚŁóŠľçń╗šÜäň»╝ňů�
- ňĄŹňłÂŔÁäŠ║ÉńŞőšÜ䊌ąšĘőš«íšÉćńŞşšÜäHTMLňł░Úí╣šŤ«šÜäwebšŤ«ňŻĽńŞőňŹ│ňĆ�
12.3 ńŞÜňŐíń╗úšáü
12.3.1 Š│ĘňćîńŞÜňŐíňĄäšÉć
- controller
package com.atguigu.schedule.controller;
import com.atguigu.schedule.pojo.SysUser;
import com.atguigu.schedule.service.SysUserService;
import com.atguigu.schedule.service.impl.SysUserServiceImpl;
import jakarta.servlet.ServletException;
import jakarta.servlet.annotation.WebServlet;
import jakarta.servlet.http.HttpServletRequest;
import jakarta.servlet.http.HttpServletResponse;
import java.io.IOException;
@WebServlet("/user/*")
public class SysUserController extends BaseContoller {
private SysUserService userService =new SysUserServiceImpl();
/**
* ŠÄąŠöšöĘŠłĚŠ│ĘňćîŔ»ĚŠ▒éšÜäńŞÜňŐíňĄäšÉ抾╣Š│�( ńŞÜňŐíŠÄąňĆú ńŞŹŠś»javańŞşšÜäinterface )
* @param req
* @param resp
* @throws ServletException
* @throws IOException
*/
protected void regist(HttpServletRequest req, HttpServletResponse resp) throws ServletException, IOException {
// 1 ŠÄąŠöÂň«óŠłĚšź»ŠĆÉń║ĄšÜäňĆ銼░
String username = req.getParameter("username");
String userPwd = req.getParameter("userPwd");
// 2 Ŕ░âšöĘŠťŹňŐíň▒銾╣Š│�,ň«îŠłÉŠ│ĘňćîňŐčŔâŻ
//ň░ćňĆ銼░ŠöżňůąńŞÇńެSysUserň»╣Ŕ▒íńŞ�,ňťĘŔ░âšöĘregistŠľ╣Š│ĽŠŚÂń╝áňů�
SysUser sysUser =new SysUser(null,username,userPwd);
int rows =userService.regist(sysUser);
// 3 Šá╣ŠŹ«Š│Ęňćîš╗ôŠ×ť(ŠłÉňŐč ňĄ▒Ŕ┤ą) ňüÜÚíÁÚŁóŔĚ│ŔŻ�
if(rows>0){
resp.sendRedirect("/registSuccess.html");
}else{
resp.sendRedirect("/registFail.html");
}
}
}
- service
package com.atguigu.schedule.service;
import com.atguigu.schedule.pojo.SysUser;
public interface SysUserService {
/**
* šöĘŠłĚň«îŠłÉŠ│ĘňćîšÜäńŞÜňŐ튾╣Š│�
* @param registUser šöĘń║Äń┐ŁňşśŠ│ĘňćîšöĘŠłĚňÉŹňĺîň»ćšáüšÜäň»╣Ŕ▒�
* @return Š│ĘňćÉňŐčŔ┐öňŤ×>0šÜ䊼┤ŠĽ�,ňÉŽňłÖŔ┐öňŤ×0
*/
int regist(SysUser registUser);
}
package com.atguigu.schedule.service.impl;
import com.atguigu.schedule.dao.SysUserDao;
import com.atguigu.schedule.dao.impl.SysUserDaoImpl;
import com.atguigu.schedule.pojo.SysUser;
import com.atguigu.schedule.service.SysUserService;
import com.atguigu.schedule.util.MD5Util;
public class SysUserServiceImpl implements SysUserService {
private SysUserDao userDao =new SysUserDaoImpl();
@Override
public int regist(SysUser sysUser) {
// ň░ćšöĘŠłĚšÜ䊜Ċľçň»ćšáüŔŻČŠŹóńŞ║ň»ćŠľçň»ćšá�
sysUser.setUserPwd(MD5Util.encrypt(sysUser.getUserPwd()));
// Ŕ░âšöĘDAO ň▒éšÜ䊾╣Š│Ľ ň░ćsysUserń┐íŠü»ňşśňůąŠĽ░ŠŹ«ň║�
return userDao.addSysUser(sysUser);
}
}
- dao
package com.atguigu.schedule.dao;
import com.atguigu.schedule.pojo.SysUser;
public interface SysUserDao {
/**
* ňÉĹŠĽ░ŠŹ«ň║ôńŞşňó×ňŐáńŞÇŠŁíšöĘŠłĚŔ«░ňŻĽšÜ䊾╣Š│Ľ
* @param sysUser ŔŽüňó×ňŐášÜäŔ«░ňŻĽšÜäusernameňĺîuser_pwdňşŚŠ«Áń╗ąSysUserň«×ńŻôš▒╗ň»╣Ŕ▒íšÜäňŻóň╝ĆŠÄąŠöÂ
* @return ňó×ňŐኳÉňŐčŔ┐öňŤ×1 ňó×ňŐáňĄ▒Ŕ┤ąŔ┐öňŤ×0
*/
int addSysUser(SysUser sysUser);
}
package com.atguigu.schedule.dao.impl;

import com.atguigu.schedule.dao.BaseDao;
import com.atguigu.schedule.dao.SysUserDao;
import com.atguigu.schedule.pojo.SysUser;
public class SysUserDaoImpl extends BaseDao implements SysUserDao {
    @Override
    public int addSysUser(SysUser sysUser) {
        String sql ="insert into sys_user values(DEFAULT,?,?)";
        return baseUpdate(sql,sysUser.getUsername(),sysUser.getUserPwd());
    }
}
12.3.2 šÖ╗ňŻĽńŞÜňŐíňĄäšÉć
- controller
package com.atguigu.schedule.controller;
import com.atguigu.schedule.pojo.SysUser;
import com.atguigu.schedule.service.SysUserService;
import com.atguigu.schedule.service.impl.SysUserServiceImpl;
import com.atguigu.schedule.util.MD5Util;
import jakarta.servlet.ServletException;
import jakarta.servlet.annotation.WebServlet;
import jakarta.servlet.http.HttpServletRequest;
import jakarta.servlet.http.HttpServletResponse;
import java.io.IOException;
@WebServlet("/user/*")
public class SysUserController extends BaseContoller {
private SysUserService userService =new SysUserServiceImpl();
/**
* ŠÄąŠöšöĘšÖ╗ňŻĽŔ»ĚŠ▒�,ň«îŠłÉšÜäšÖ╗ňŻĽńŞÜňŐíŠÄąňĆ�
* @param req
* @param resp
* @throws ServletException
* @throws IOException
*/
protected void login(HttpServletRequest req, HttpServletResponse resp) throws ServletException, IOException {
//1 ŠÄąŠöšöĘŠłĚňÉŹňĺîň»ćšáü
String username = req.getParameter("username");
String userPwd = req.getParameter("userPwd");
//2 Ŕ░âšöĘŠťŹňŐíň▒銾╣Š│�,Šá╣ŠŹ«šöĘŠłĚňÉŹŠčąŔ»óšöĘŠłĚń┐íŠü�
SysUser loginUser =userService.findByUsername(username);
if(null == loginUser){
// ŔĚ│ŔŻČňł░šöĘŠłĚňÉŹŠťëŔ»»ŠĆÉšĄ║Úí�
resp.sendRedirect("/loginUsernameError.html");
}else if(! MD5Util.encrypt(userPwd).equals(loginUser.getUserPwd())){
//3 ňłĄŠľşň»ćšáüŠś»ňÉŽňî╣ÚůŹ
// ŔĚ│ŔŻČňł░ň»ćšáüŠťëŔ»»ŠĆÉšĄ║ÚíÁ
resp.sendRedirect("/loginUserPwdError.html");
}else{
//4 ŔĚ│ŔŻČňł░ÚŽľÚí�
resp.sendRedirect("/showSchedule.html");
}
}
}
- service
package com.atguigu.schedule.service;
import com.atguigu.schedule.pojo.SysUser;
public interface SysUserService {
/**
* Šá╣ŠŹ«šöĘŠłĚňÉŹŔÄĚňżŚň«îŠĽ┤šöĘŠłĚń┐íŠü»šÜ䊾╣Š│Ľ
* @param username ŔŽüŠčąŔ»óšÜäšöĘŠłĚňÉ�
* @return ňŽéŠ×ťŠëżňł░ń║ćŔ┐öňŤ×SysUserň»╣Ŕ▒í,ŠëżńŞŹňł░Ŕ┐öňŤ×null
*/
SysUser findByUsername(String username);
}
package com.atguigu.schedule.service.impl;
import com.atguigu.schedule.dao.SysUserDao;
import com.atguigu.schedule.dao.impl.SysUserDaoImpl;
import com.atguigu.schedule.pojo.SysUser;
import com.atguigu.schedule.service.SysUserService;
import com.atguigu.schedule.util.MD5Util;
public class SysUserServiceImpl implements SysUserService {
private SysUserDao userDao =new SysUserDaoImpl();
@Override
public SysUser findByUsername(String username) {
// Ŕ░âšöĘŠťŹňŐíň▒銾╣Š│�,š╗žš╗şŠčąŔ»ó
return userDao.findByUsername(username);
}
}
- dao
package com.atguigu.schedule.dao;
import com.atguigu.schedule.pojo.SysUser;
public interface SysUserDao {
/**
* Šá╣ŠŹ«šöĘŠłĚňÉŹŔÄĚňżŚň«îŠĽ┤šöĘŠłĚń┐íŠü»šÜ䊾╣Š│Ľ
* @param username ŔŽüŠčąŔ»óšÜäšöĘŠłĚňÉ�
* @return ňŽéŠ×ťŠëżňł░ń║ćŔ┐öňŤ×SysUserň»╣Ŕ▒í,ŠëżńŞŹňł░Ŕ┐öňŤ×null
*/
SysUser findByUsername(String username);
}
import com.atguigu.schedule.dao.BaseDao;
import com.atguigu.schedule.dao.SysUserDao;
import com.atguigu.schedule.pojo.SysUser;

import java.util.List;

public class SysUserDaoImpl extends BaseDao implements SysUserDao {
    @Override
    public SysUser findByUsername(String username) {
        String sql ="select uid,username, user_pwd userPwd from sys_user where username = ?";
        List<SysUser> userList = baseQuery(SysUser.class, sql, username);
        return  null != userList&& userList.size()>0? userList.get(0):null;
    }
}